Watch video recording & Get follow-along PBIX example
If you'd like to try all of this yourself, enter your data below to get immediate access to the PBIX example used in the this tutorial and the full 90-minute recording of the webinar.
 September 8th
 February 22nd
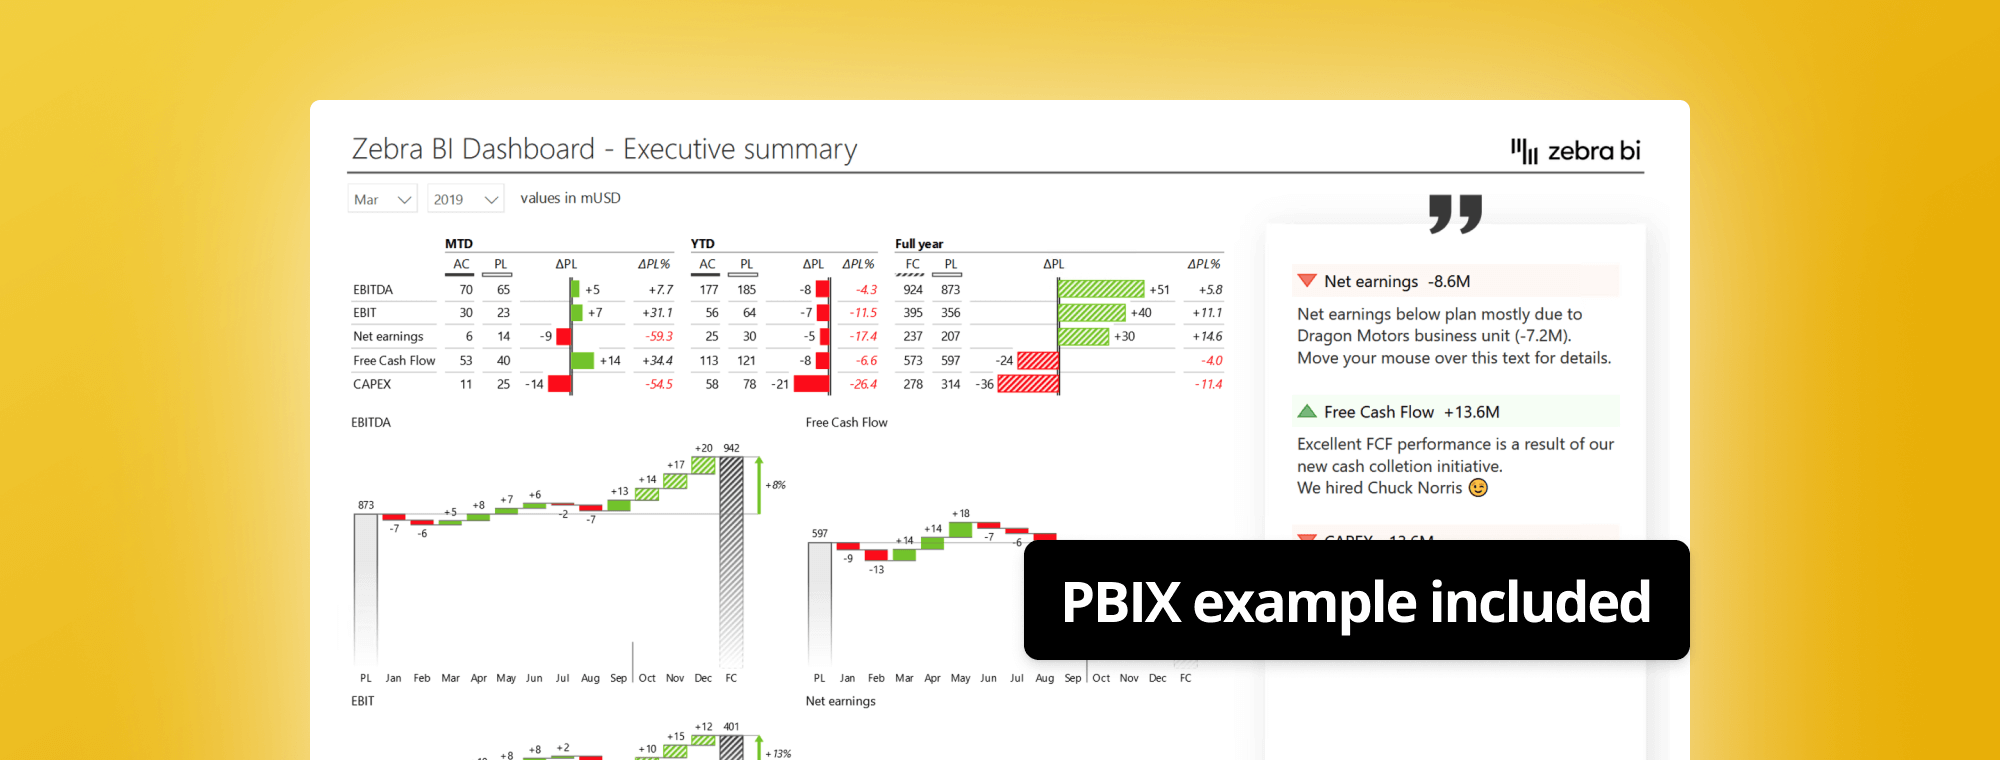
Comments are chronically missing from Power BI dashboards and reports. However, if you manage to include dynamic commentary, your reports will become strikingly more understandable and actionable. The real challenge is setting up dynamic commentary that will respond to filters and even allowing users to add comments.
Very often Power BI dashboards and reports don't actually have any kind of comments or explanatory notes let alone that they would be dynamic. That is any text, comments that would actually explain your figures, values, and variances.
It's important because there are always certain situations, even certain facts, that are not in your Power BI model. Instead, they may be in the heads of your co-workers, hidden somewhere outside the system, stored within certain other data sources that are not connected to Power BI or anywhere else.
The true value of a comment lies in the fact it can contain information that is not present in the data.
And if you can organize people, or you actually write those comments and explanations somewhere by yourself and then pull those comments into your Power BI dashboards, you will make your reports and dashboards much more understandable and much, much more actionable. Because those comments will answer the question "Why?". Why has something happened?
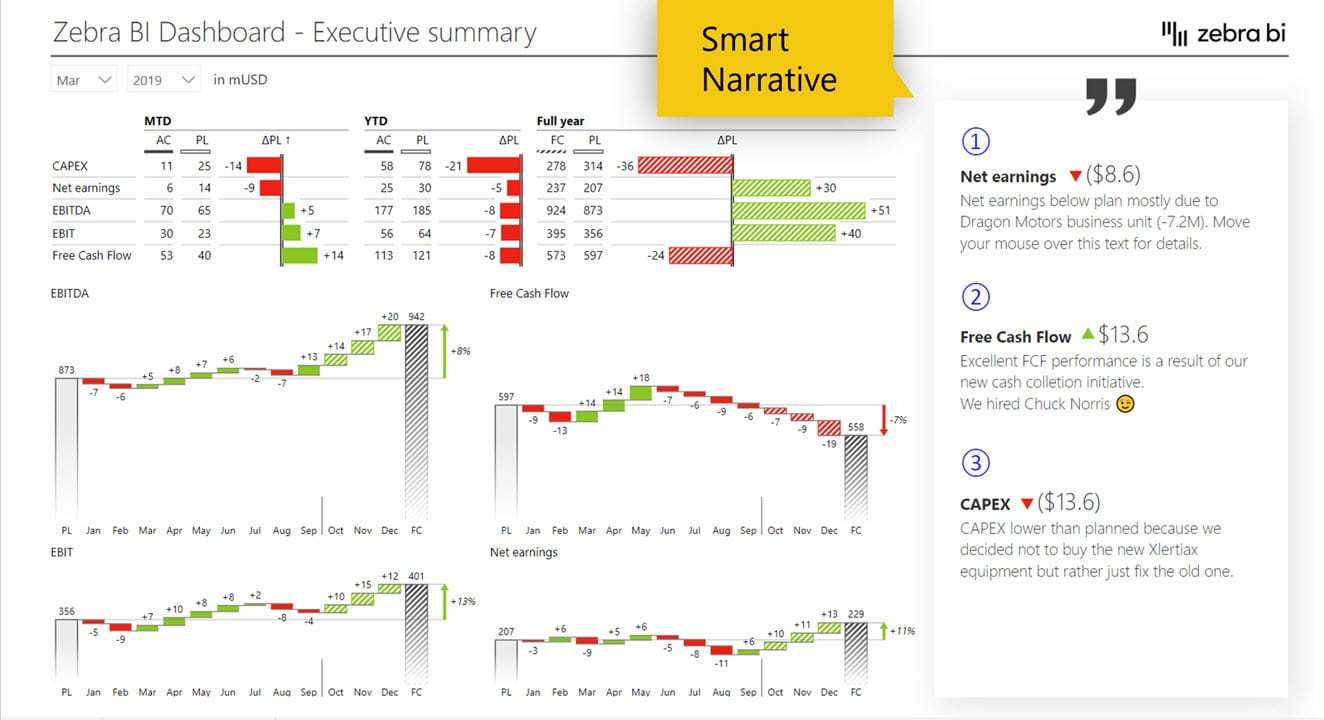
In the example below, our net earnings in March 2019 were below the plan for almost 9 million US dollars. And looking at the comment we can actually read why. In our case, it's due to a certain business unit.
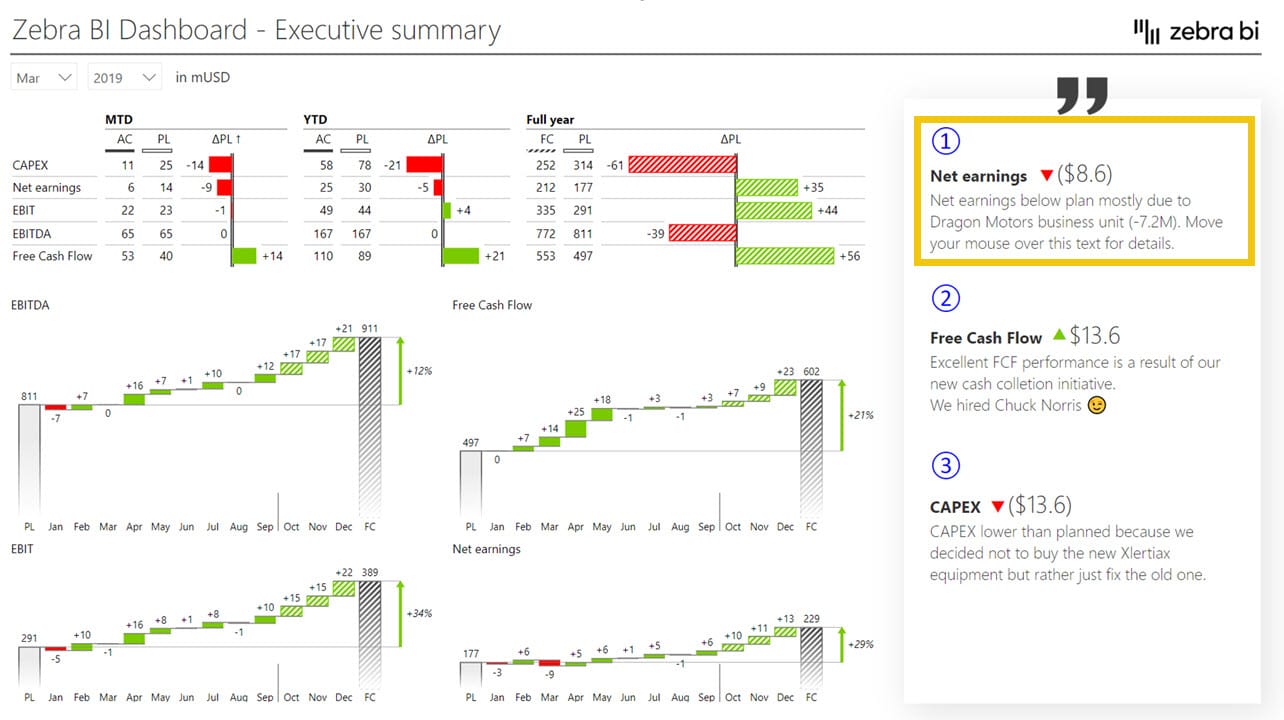
So the explanation, the value of such a comment, can be very high because it may simply contain certain information that is not in your Power BI data but could be of vital importance.
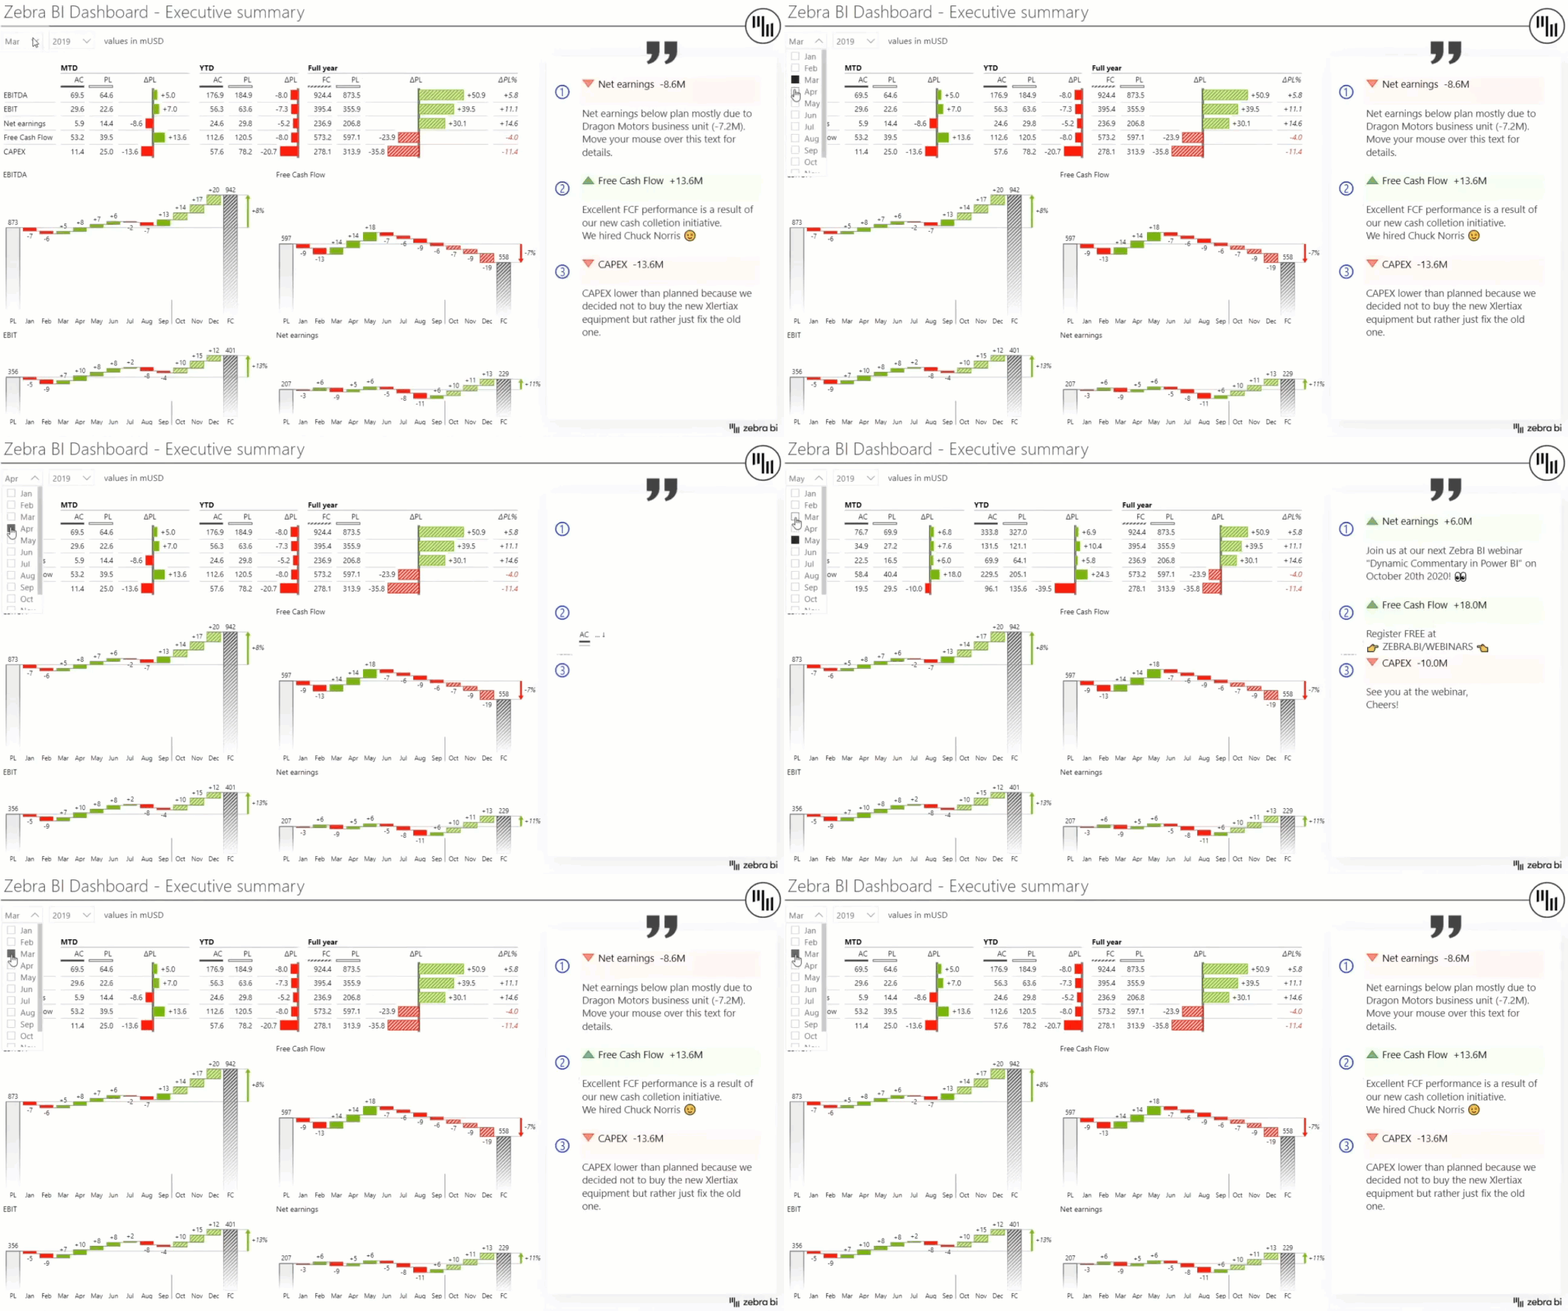
Even better, if you put into your Power BI report dynamic comments, that would actually change with the time period. For example, if you change your periods in Power BI, your comments will change as well, giving you new comments altogether. When you do this in a dynamic way, especially if you manage to organize a few more people to those comments and then channel everything through a dashboard to the right user, you will end up with much more effective and actionable comments in Power BI.
Here are the five most common methods of commenting in Power BI:
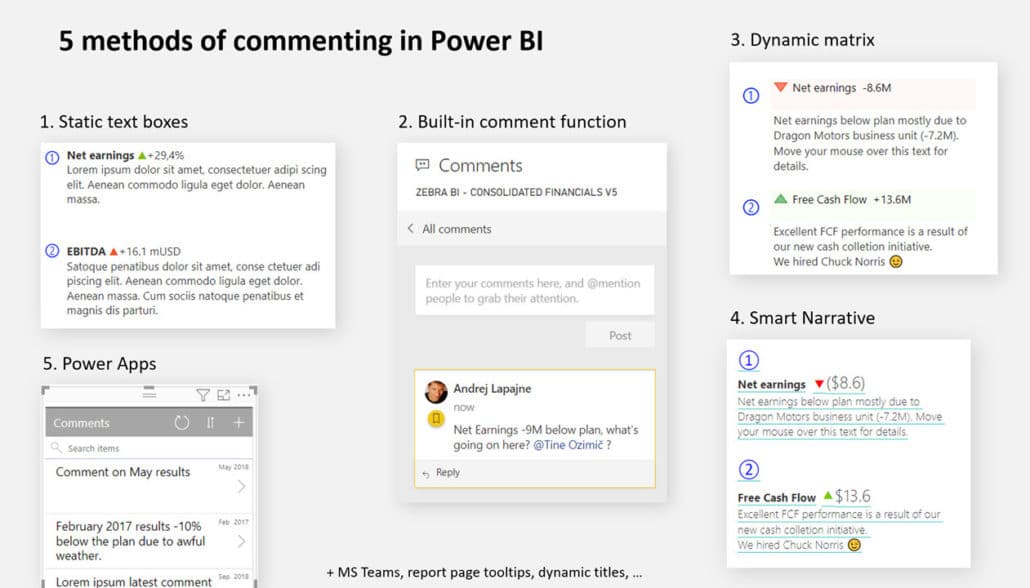
The other, indirect options in Power BI that can allow for some form of commenting include your Power BI reports in Teams, with its commenting chats functionality. You can use include comments in dynamic report page tooltips to bring them directly into your visuals. Additionally, you have options for dynamic titles within Power BI, so you can use that, among many other things.
In this article, we'll go through the basics of setting up dynamic commentary by taking a deep dive into options 3 and 4 from above: dynamic matrix and smart narrative.
To start with any commenting solution, the number one prerequisite is a comments table. It is a simple table that you can build in Excel, and has at least two columns. So you, or your users, can write inside this file, which you can upload to SharePoint folder or OneDrive to make sure that more users have access to it, so more users can then actually write those comments.
The other minimum requirement is a date field that will serve as a relationship to your calendar dimension, because most of the time you will want your comments to be linked or filtered by a certain time period. This way, when you change your month, you can expect your comments to change with it. So you need to have the date, either a DateID or just a date field, depending on your Power BI model.
In most cases, though, only those two fields won't be enough. Realistically, your comments will probably also refer to certain KPIs, business units, or other items that you can use as a filter for your comments. You'll, of course, need to add additional columns to your comments table.
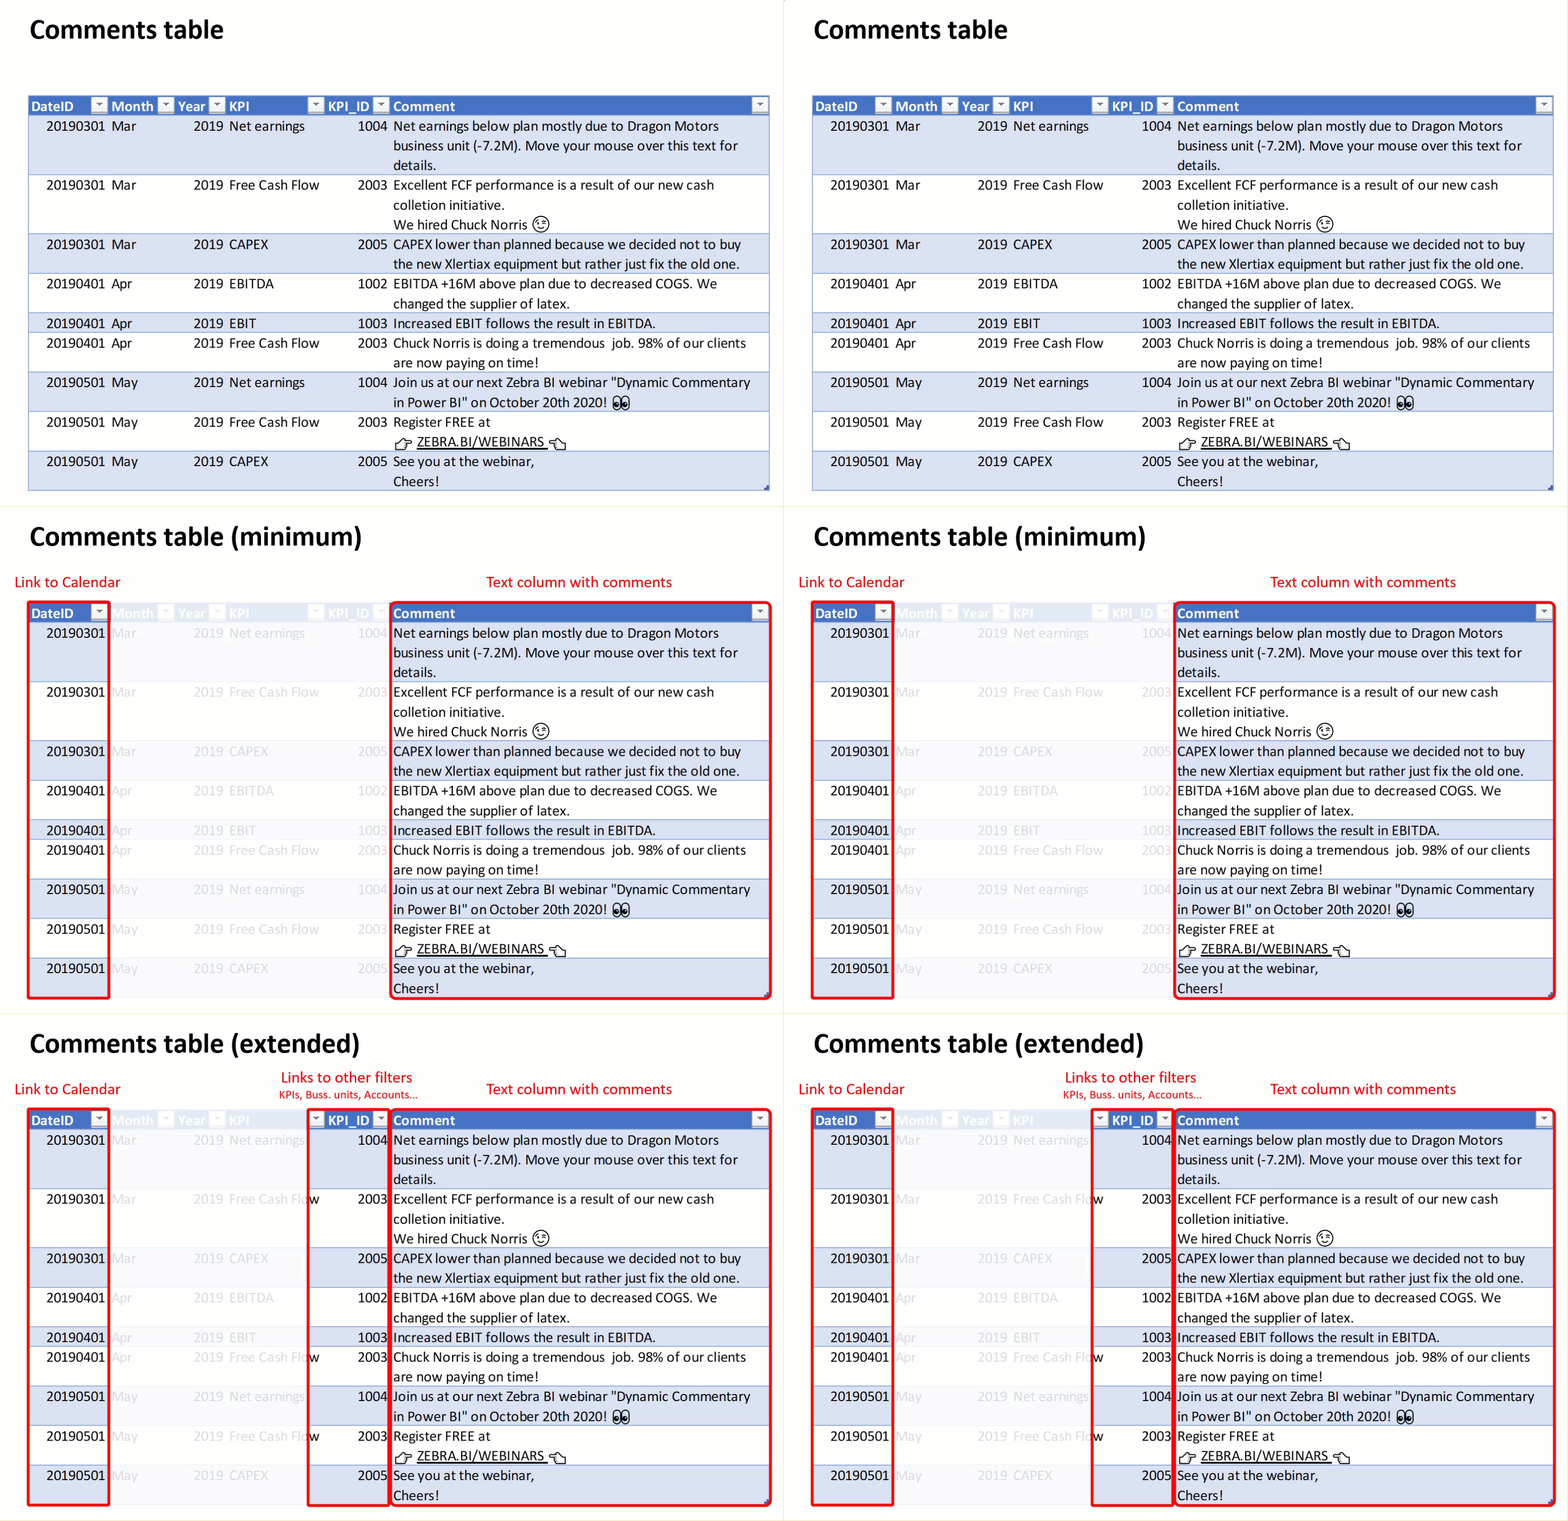
When you have your comments table ready, you can include it into your Power BI model. Import your comments table under the Home tab and find the right file when prompted.

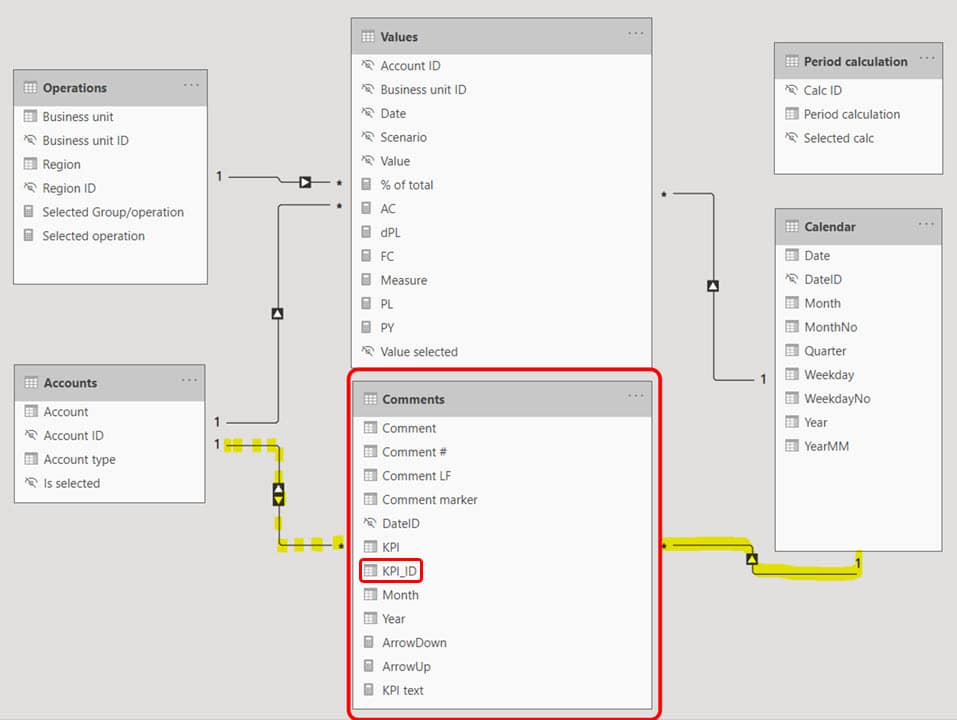
Once you load your comments table into Power BI you will see it in the relationships view. The best Power BI model in most situations is still a proper star schema, where you have a fact table. Now, in addition, you also have the comments table in your Power BI model. You will need to make a relationship from the calendar table to the comments table (one-to-many relationship). This is to make sure that your time filters will actually filter the comments table.
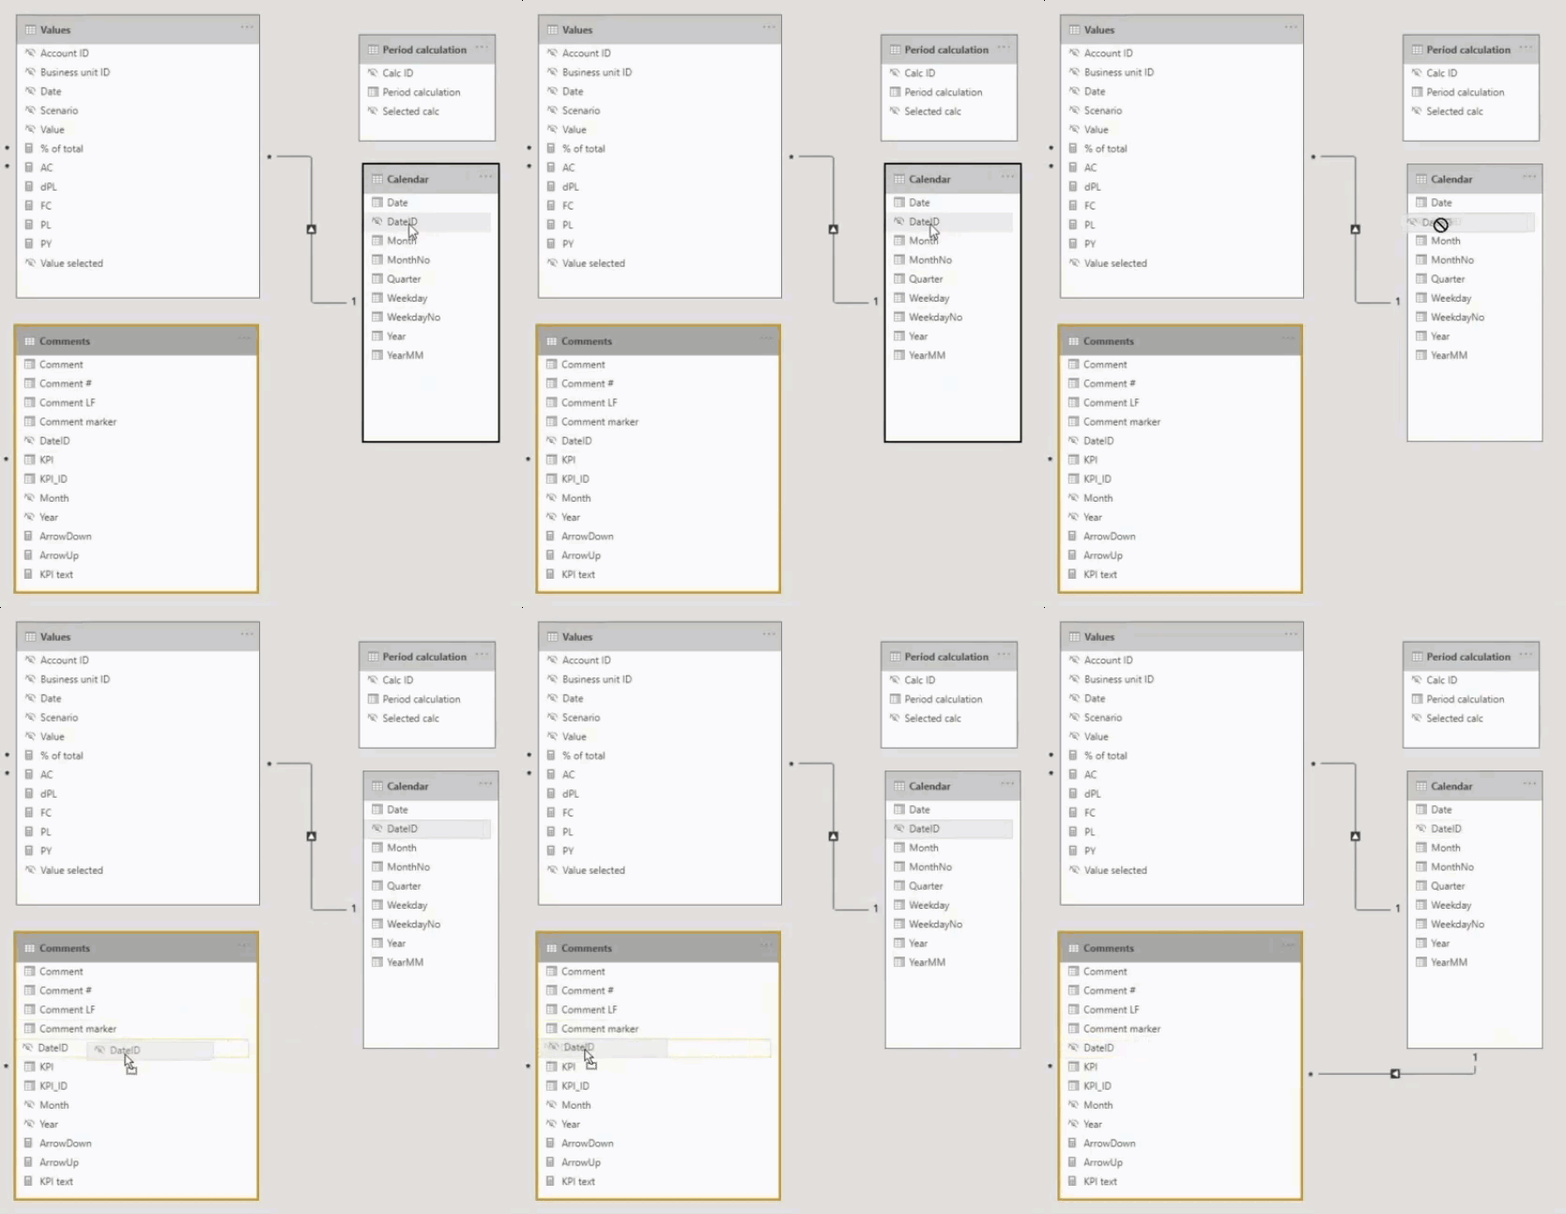
In our case, we also have the link between Accounts (which are actually the KPIs within the report) and the KPI ID (In the Comments table). This is to make sure that the KPIs will also filter the comments.
The accounts are, in this case, just a normal dimension - unpivoted KPIs, not measures. So next to Date ID, you can also set a company code, organizational ID, business units, countries or some other dimension. You only need to make sure that you make a relationship between your ID column in your dimension and your comments table.
After you load the comments and make the needed relationships, return to the report view where you'll see your comments table among other fields on the right side. You can now display the comments, for our example, we'll use a simple matrix and just mark the comment field to insert it. This is now the basic version of commenting - having comments for specific time periods.
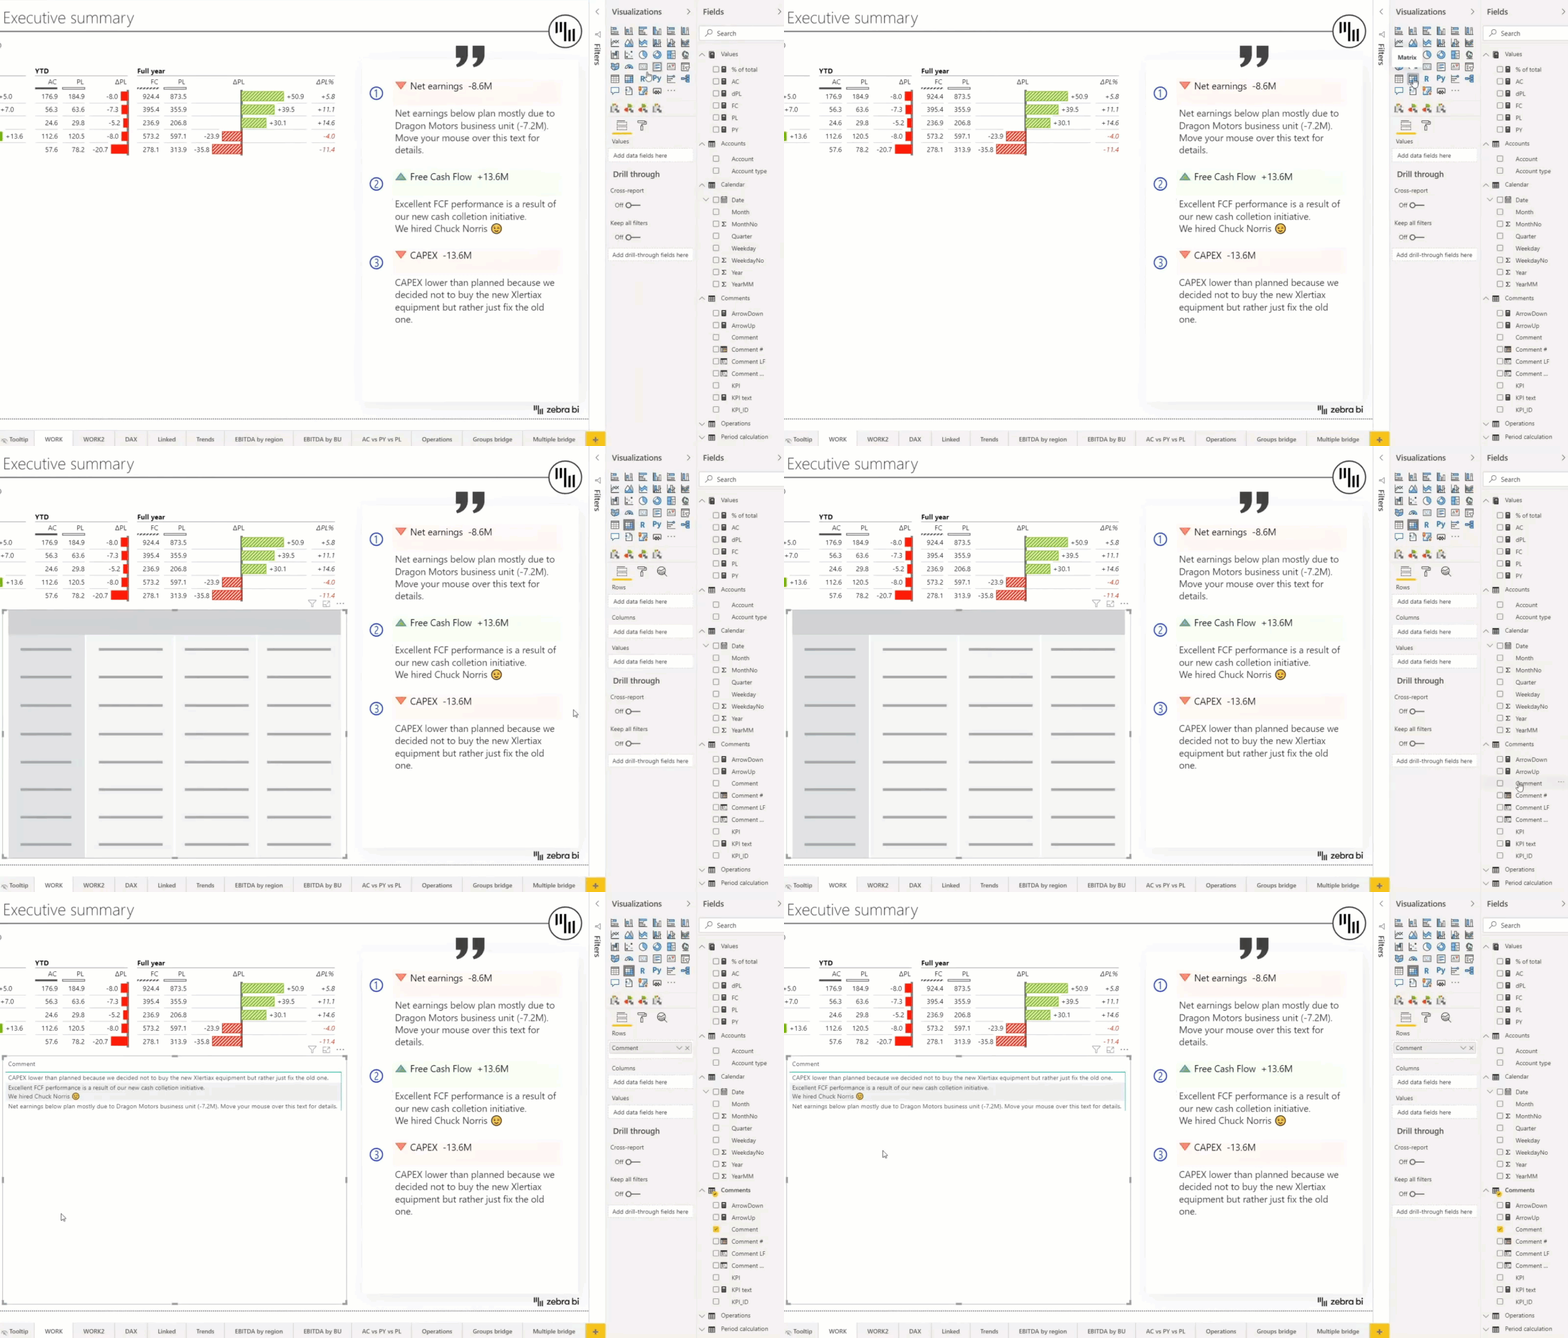
Now, because we made the relationship, the comments will dynamically change along with the displayed month when you change it (using a slicer, for example).
To make a report of great quality you can also try to make it more comprehensive and clean. To do that we'll try to recreate the matrix you see above, which includes highlighted headings, numbered symbols and is overall much more intuitive.
You can achieve this by using a few design options, as well as DAX. First, you should make sure that the text in the comments is visible enough and has neat formatting. Under the Visualizations tab, you can find native options for editing, as well as how the comments are defined. In our case, Power BI treats the comments as Rows, so we know what formatting options will affect the visual. For now, we will just increase the text size.

The next thing we can fix is the lack of space between individual rows. The matrix visual itself does allow you to add some space between the rows. But there is another way - Instead, you can add a line feed, using a DAX formula, displayed below, that returns a new line and a non-breaking space. This will allow us to get an additional empty row at the end of each comment. So instead of just displaying comments, we will now display the comments with this empty row.
1 Comment = Comments[Comment] & UNICHAR(10) & UNICHAR(160)
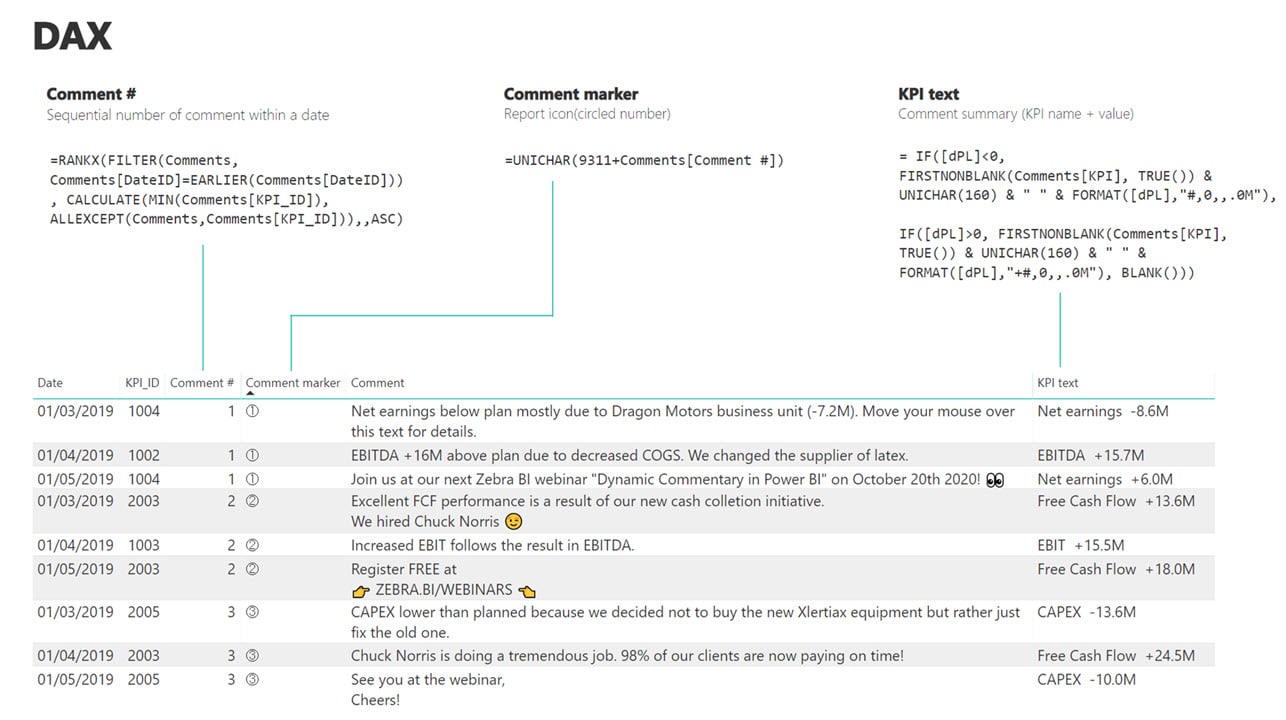
More, you can design it so that the matrix won't just show the comments, but also have a field with a comment header or comment summary above, where you can display the name of the KPI and its value. To do this, you should first create a new measure (in our case KPI text). What we want to do with this measure is, essentially to concatenate the value we want to display, in our case variance to plan (dPL). Alongside are also some settings to help with design like spacing, display value in millions and to add + or - symbol in front when the value is positive or negative, respectively.
KPI text = IF([dPL]<0,
FIRSTNONBLANK(Comments[KPI], TRUE()) & UNICHAR(160) & " " & FORMAT([dPL],"#,0,,.0M"),
IF([dPL]>0, FIRSTNONBLANK(Comments[KPI], TRUE()) & UNICHAR(160) & " " & FORMAT([dPL],"+#,0,,.0M"),
BLANK()))
The problem now arises when you want to add KPI text to the Rows field, along with Comments we created before. However, because KPI text is a measure we can not do that, so instead we will move both, comments and KPI text to the Values field. Instead of them, we will add the Comment marker, which is a nice way to mark the comment according to the IBCS standard.
To do that, you first have to create two new measures. The first one will be the Comment number(#), and the other the Comment marker.
The Comment number is the sequential number of your comments within your date period. Essentially, we are creating three numbers (1,2,3) for each month and each of those numbers represents one comment that is associated with its KPI. So we have within a month 3 KPIs that are displayed, and each of those KPIs will have its own comment.
Comment # = RANKX(
FILTER(Comments, Comments[DateID]=EARLIER(Comments[DateID])),CALCULATE(MIN(Comments[KPI_ID]), ALLEXCEPT(Comments, Comments[KPI_ID])),,ASC)
You can then use this comment number, which is a calculated column, to then actually create a Comment marker, which is also a calculated column. The Comment marker takes the comment number and simply transfers it to the text character that has the same number but uses text characters for display in our table.
Comment marker = UNICHAR(9311 + Comments[Comment #])

You can now use the Comment marker and put its calculated column into the Rows field, that was previously occupied by Comments. All of this is now the basics for this matrix, but it could still use some polish in its design.
If you're interested in learning a lot more about DAX, watch this Power BI DAX webinar.
First, we will edit row headers, that are actually now our comment markers. You can edit them under the Visualizations pane, where you can change text size, color, font type, disable stepped layout, and more.
Note: Be careful when changing fonts, as some symbols aren't rendered reliably on the Power BI Service. In our case, we changed the Comment marker symbols font to Calibri, which works better for special characters.
In order to save space and make the matrix more clear, you can try to change the structure of your value columns from left-right into one below the other.
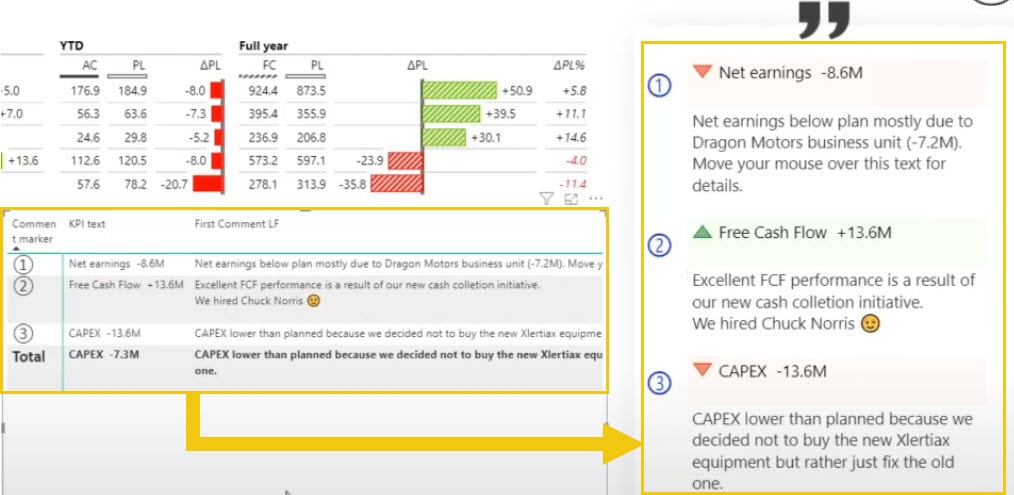
How do you do that? Start in the Values field where you can enable the option called Show on rows, which makes the columns become transposed and displayed one below another. But we still have a lot to do to reach the desired shape of our matrix. Luckily, it is only a matter of tweaking some design settings in order to make everything look clearer. First, you can also disable Banded row style option and change the alternate background color from grey to white.

After you finish this, you can see that the actual names of fields are not really needed anymore, as they provide no value to our analysis. But before you completely hide it, make sure to disable the word wrap, but not in the values, but rather in the row headers. While you're at it, you can also disable subtotals and do the same with word wrapping for column headers.
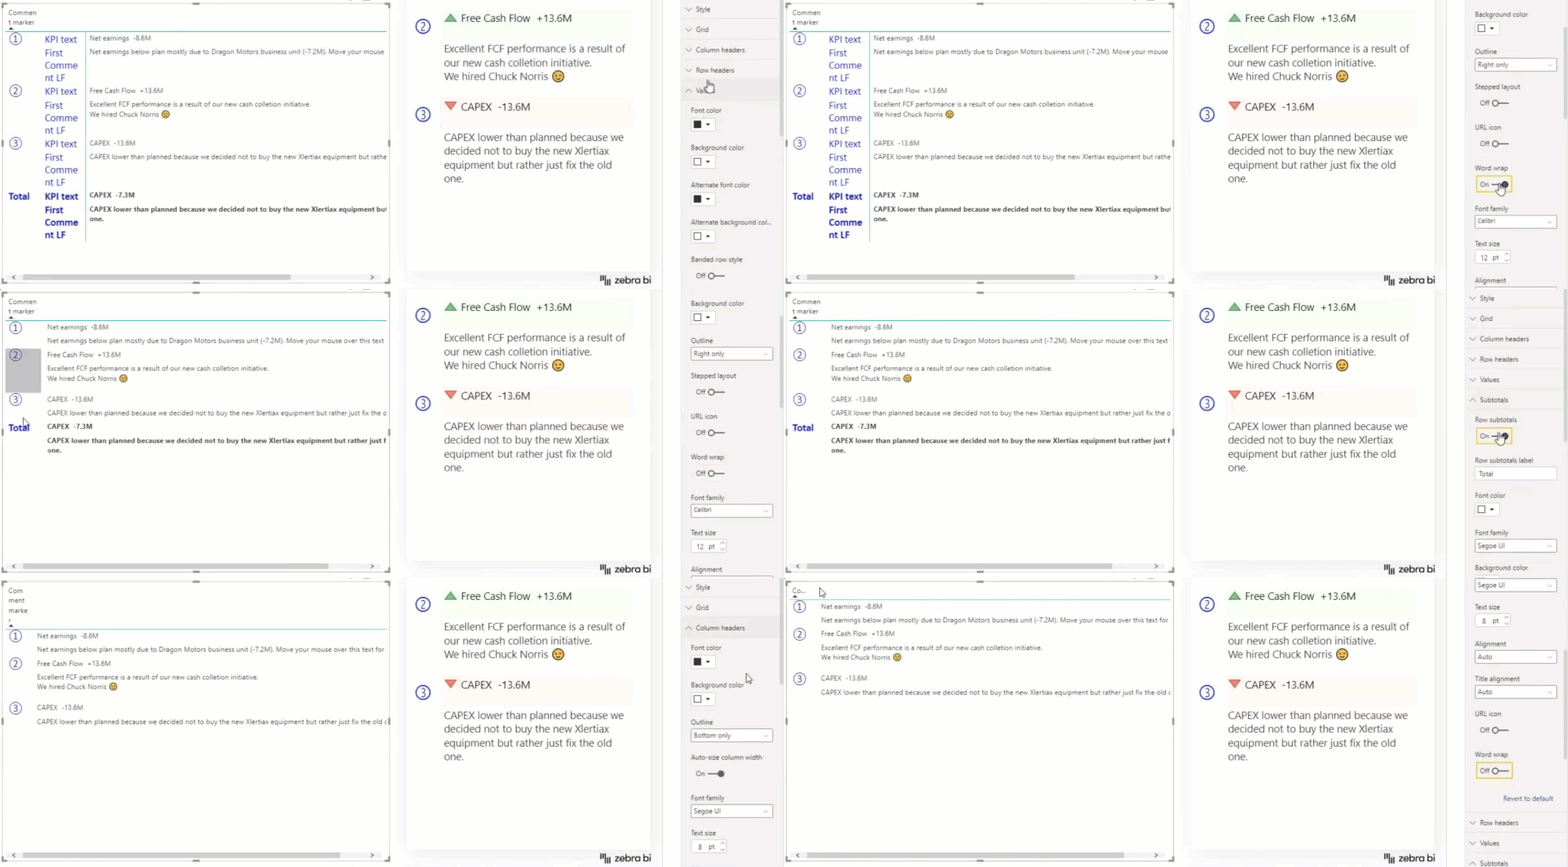
As we changed quite a bit, you can once more adapt the text size to better accommodate your end-users. In our case, size 12 will be well enough. As for the final step of the rearranging columns, you can now drag the column width closer to give the matrix its final shape.

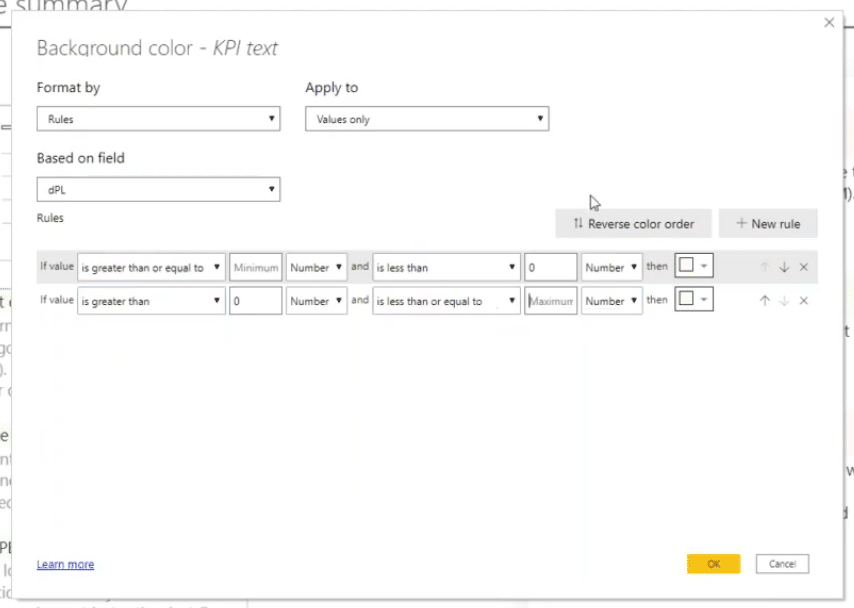
Like almost everything else, you can also design conditional formatting under the Visualizations. We will first tackle the Icons. when you enable them, a new pop-up window will appear where you can manage specific conditions and parameters for your formatting. In this case, we'll simply format the icons based on the actual value, specifically our variance to plan. We'll set up two rules: for the first one, we'll display a red triangle (negative), while for the second one, we'll display a green triangle (positive).
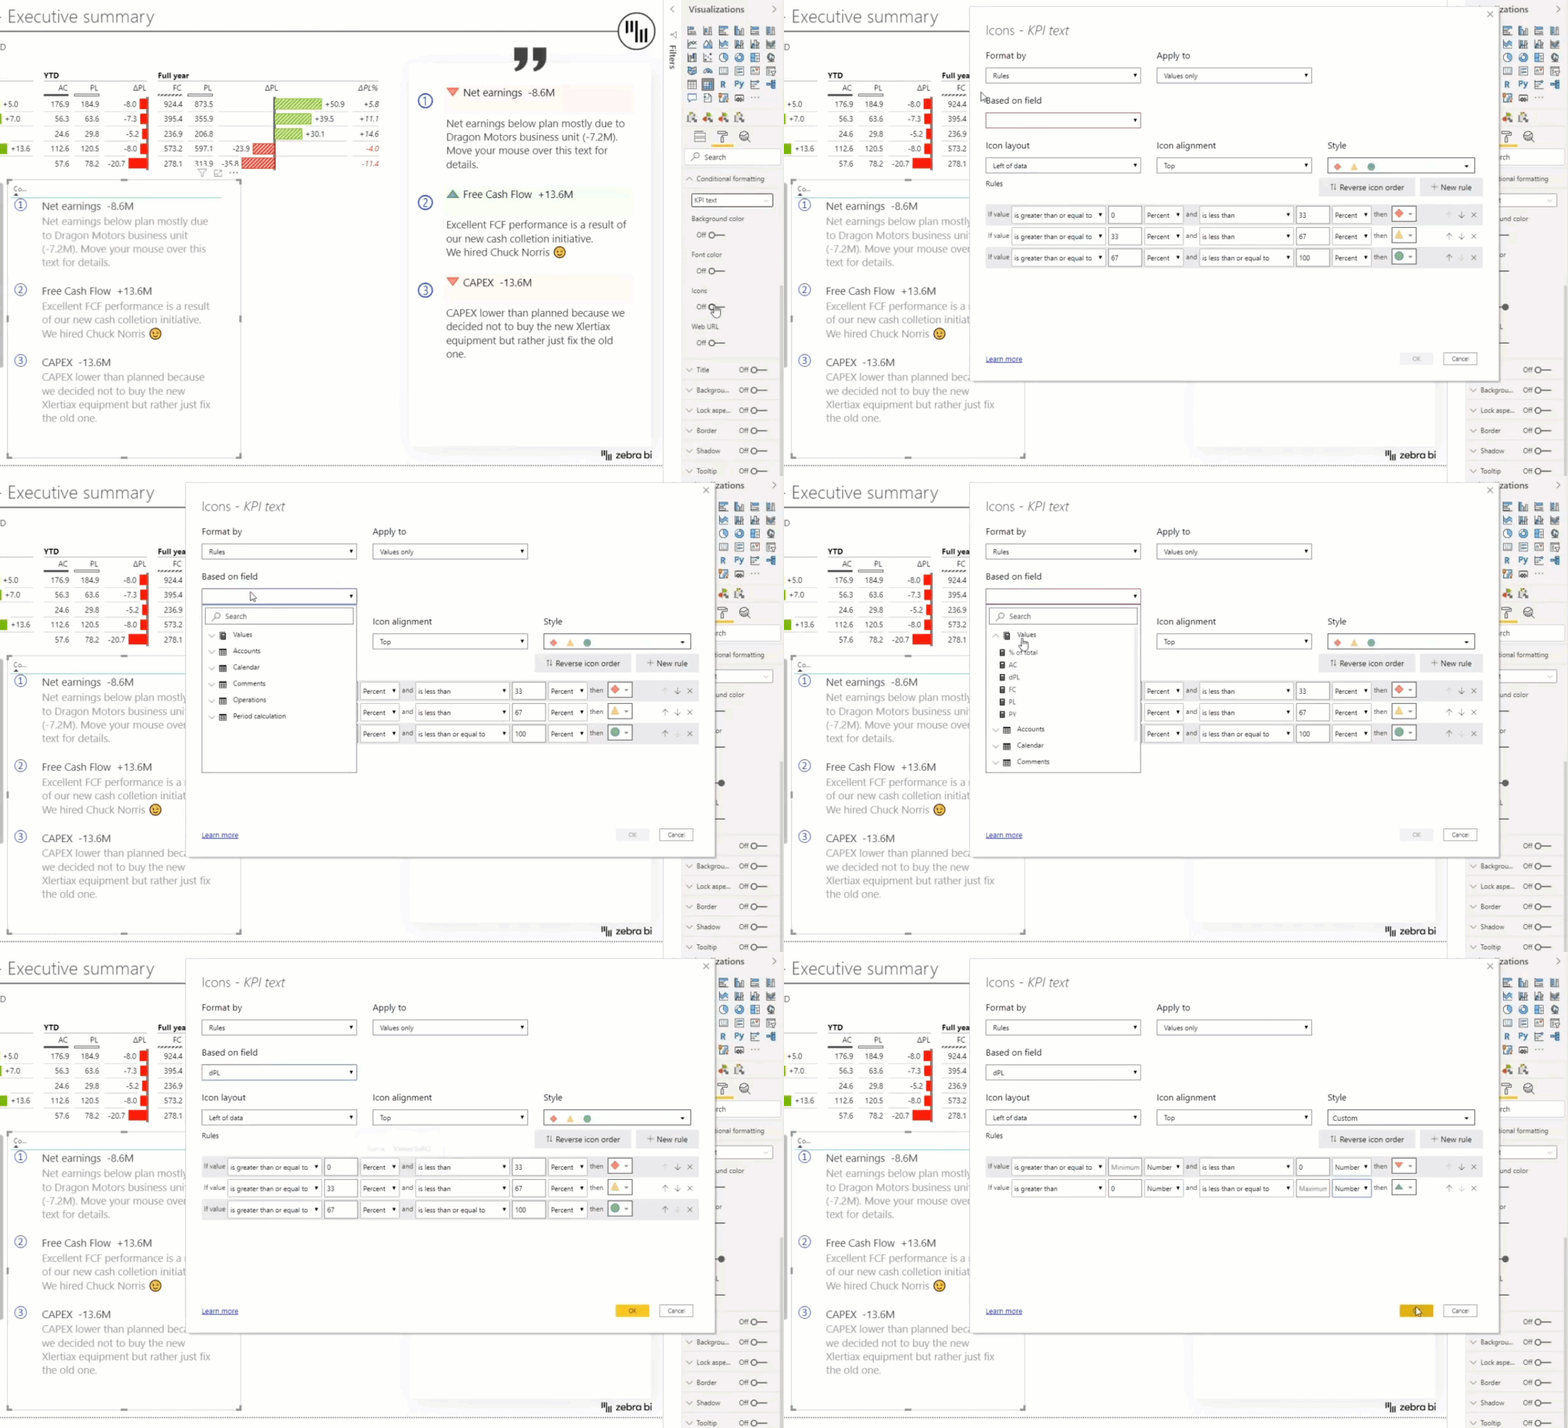
Let's start with the negative one. Power BI, unfortunately, always needs to have two conditions for a rule to apply. For the negative values the rule should be the following:
If value is greater or equal to minimum number and is less than 0 number, then red triangle (icon)
All of these you can easily select by clicking on the edit box and choose the desired option, or typing in the number. There is just one problem here: how to apply the minimum?
The trick is to simply delete everything from the edit box. This way, the rule will then apply from the minimum value to zero, meaning all negative numbers.
You can do something similar for the positive values. In the end, the rule should be:
If value is greater than 0 number and is less than or equal to maximum, then green triangle (icon).
Once again, everything you can either easily type into the box or select from the given options. As for the maximum, use the same technique as with the minimum before by deleting everything from the box. Simply click OK for the rules to apply and you should then see the appropriate icon appear next to the header in your matrix.
If you also want to apply a slight background color, you first enable the option, after which a similar pop-up window will appear that works very similarly to the one with the icons. Switch the Format by option from Color scale to Rules and just do exactly the same as with icons, only for you to choose colors in the end. Remember to use light colors, so that the text will be easy to read and so you'll keep a clean and simple design. In the end, the settings should look something like this:
And the result:

Now you have a nice way how to display comments dynamically in your Power BI. In this method, we're simply pulling a data table and the comments into a matrix and do a little designing.
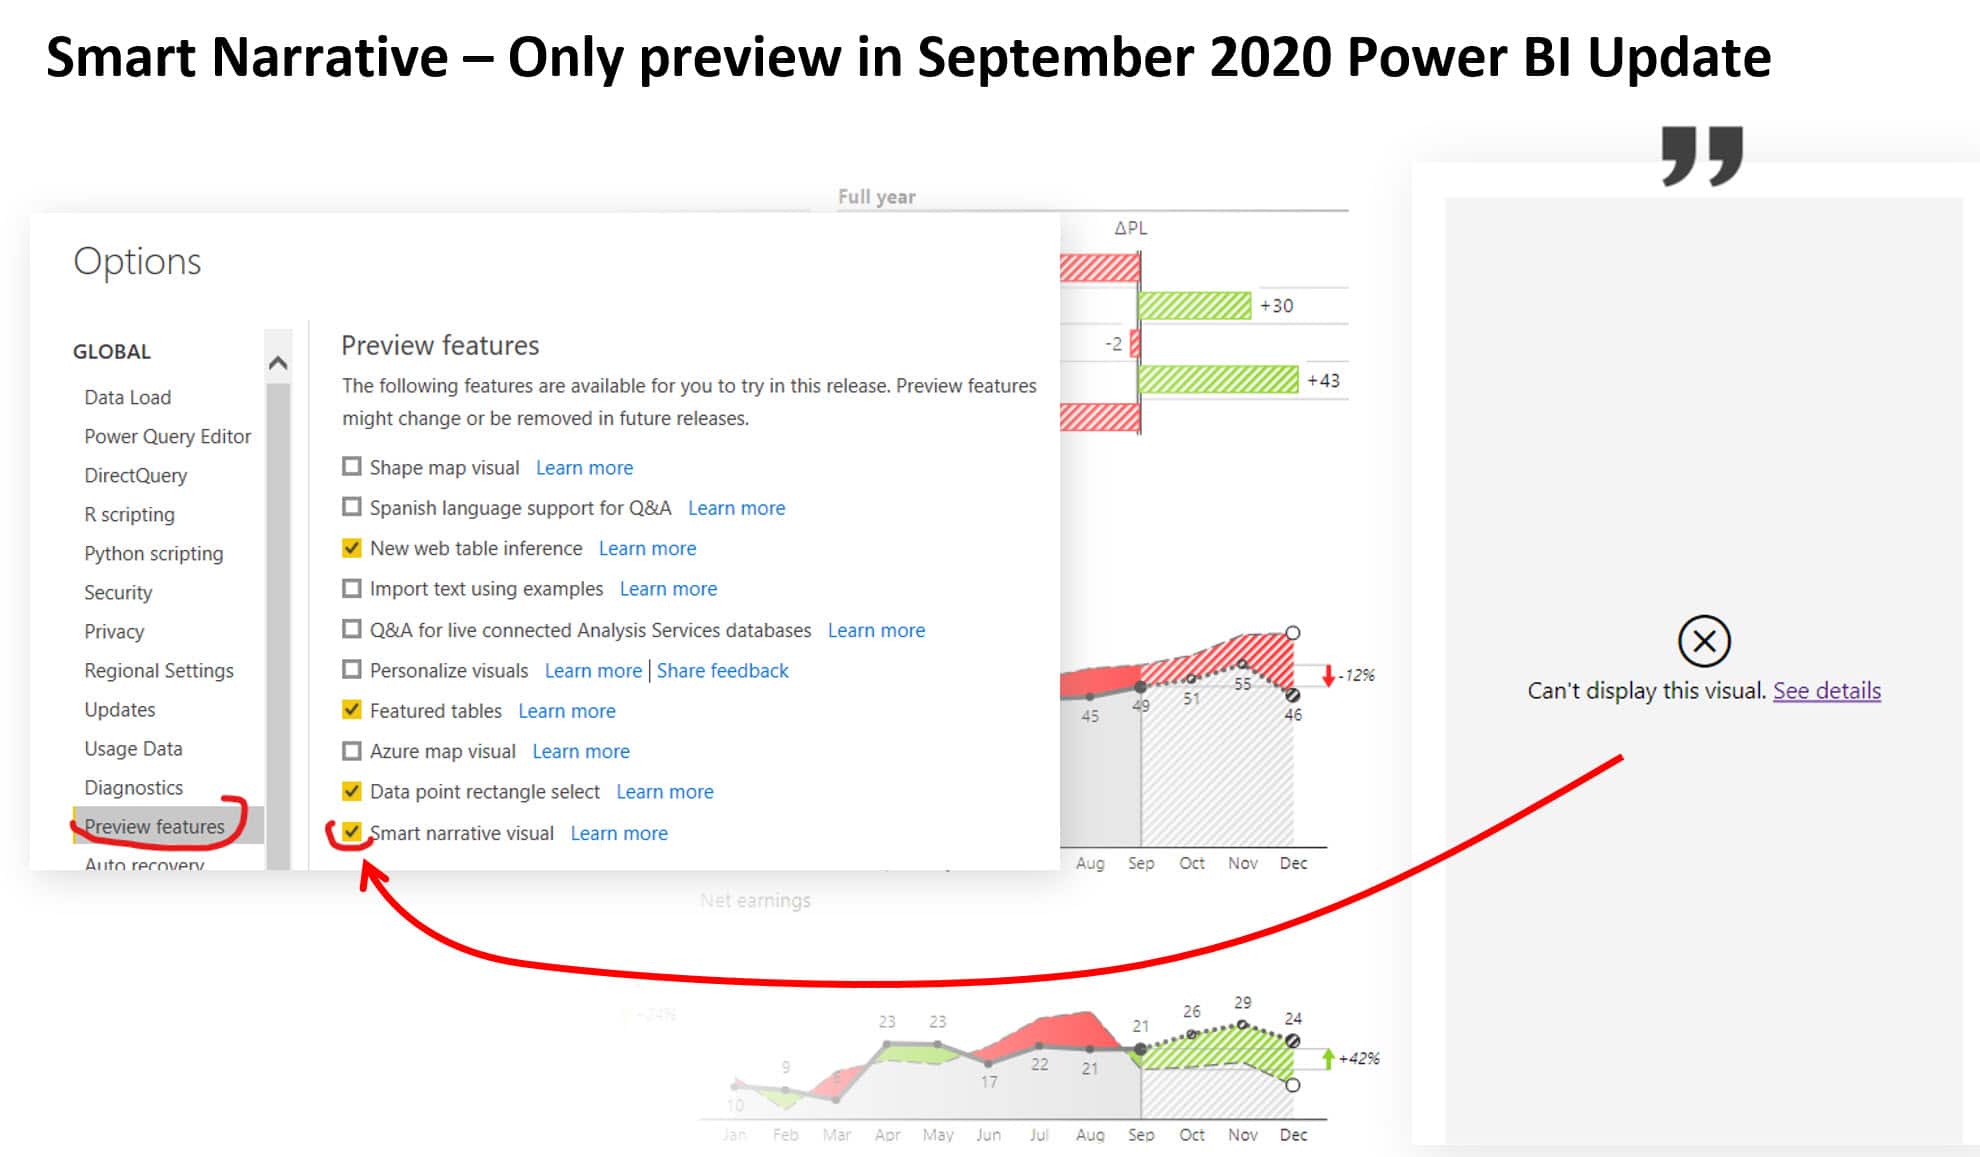
Note: At the time of writing this, smart narrative was a preview feature in the September 2020 update for Power BI. You have to manually enable it, so you'll be able to not only create with it, but to even see it in the report. Currently, this feature only works in Power BI Desktop. Check out below to see how to enable it:
The second method is called a Smart narrative. Think of the smart narrative as a sort of a smart text box where you can have pieces of text that can be completely dynamic. You can actually format each word, or each sentence, or each character in a different way, so apply colors, font sizes, font types and more. This makes smart narrative very interesting for constructing dynamic comments. Instead of just having a fixed text, you can make only some parts of the text dynamic.
What is slightly more awkward is that the users who will open the file and don't have this option enabled, they won't see this visual, they will actually just see an error message that this visual can't be displayed.
Once you enable this preview feature, there are two ways to insert it into your report. The first is the new icon below the Visualizations:

This will insert a text box that has some more options to tinker around. And since this is really just a text box, you can also insert it like you would a normal text box until now via the Insert tab. The difference is that it is now more dynamic instead of static. The way how it works is that it uses the natural language processing. You can write some text directly into the box, or you can click Add Value.
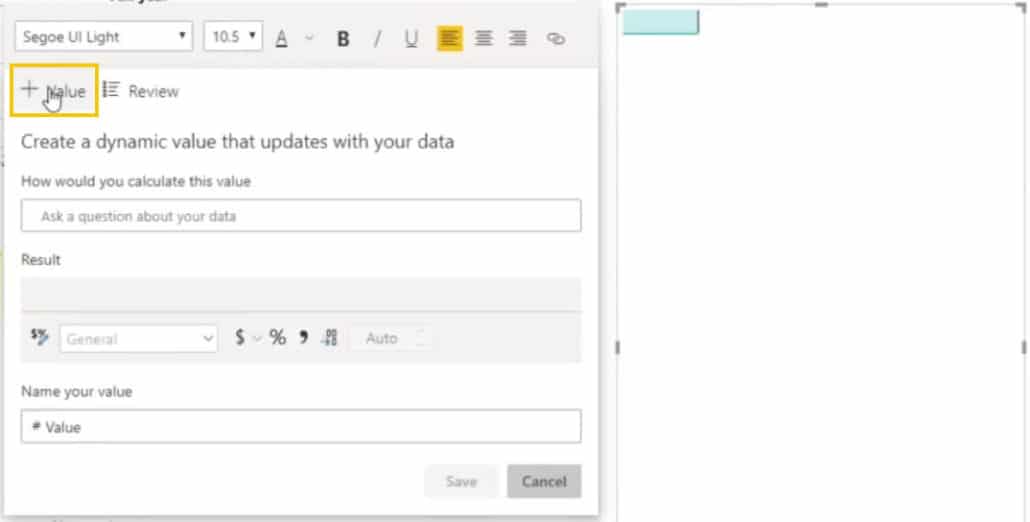
Here's an example: Let's try to pull in the comment marker from before. While you're typing you should already get some suggestions, one of them being the comment marker. And then, let's say, we want to show the comment marker for the first comment. So the final calculation of this value will be: "comment marker where comment # is 1" You can now name this value, for example marker one.
Think of it as a variable that holds one value.
Next, let's add the header. Add another value like before, only this time you should write "KPI text where comment # is 1". Doing it this way, you need to do it one by one because the variables only return one, single value. At the moment, there's no way to return a whole list of values across multiple values for a column or something similar.
And the third value will be the actual comment. So you type "comment where comment # is 1".
Now you can simply select parts of the text, make that text bigger, change the color, change the font type, and other things you would be able to change in a normal static text box.
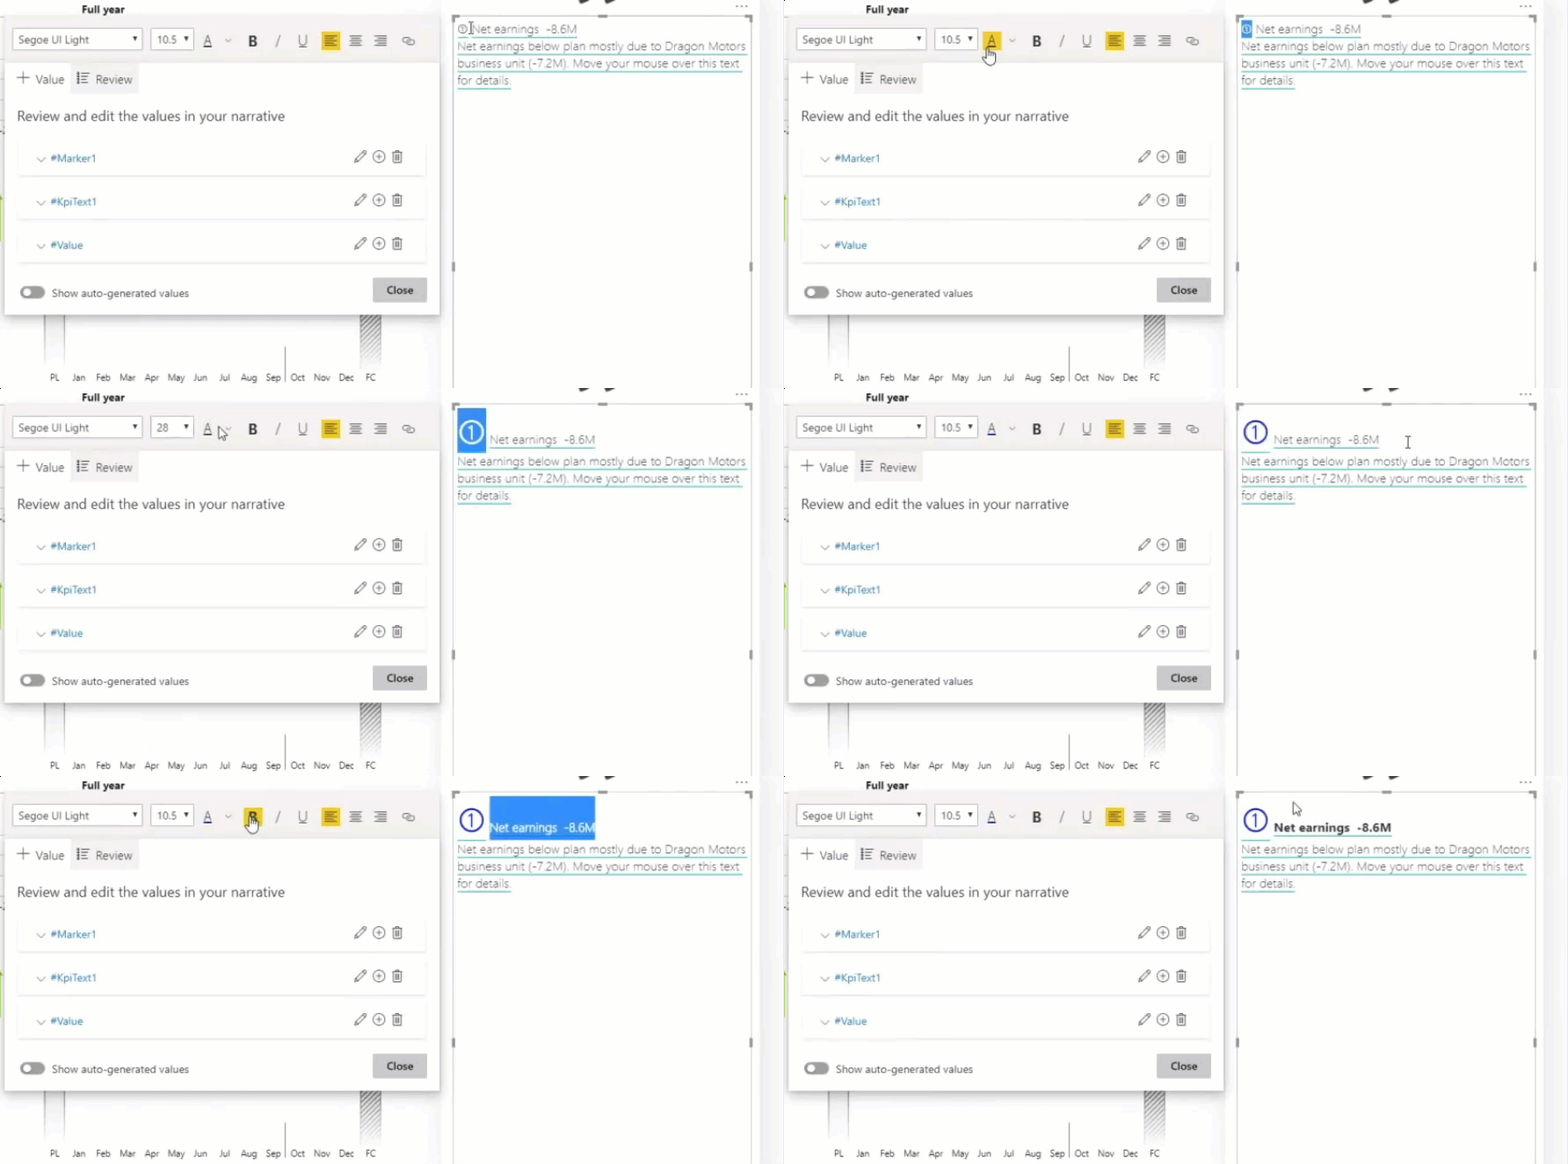
So there are quite a lot of options how you can go around doing this now. Let's try to add the red and green arrow symbols from before. One issue with the smart narrative at this time (September 2020) is that it doesn't provide any kind of custom conditional formatting options. So to go around this, you have to first create two new measures.
The first one is called ArrowDown, and it simply checks if your variance to plan is below zero. So if it's a negative plan, then this measure returns the triangle.

And to add the triangle into the smart narrative, click again to add value and, for this example, type "arrow down where comment # is 1" The only thing that remains is to color the arrow red, which you can do with the text box options. Note that, in this case, the arrow will not show if the value is positive. That is because we defined the measure to return the triangle if the variance to plan is below zero. So, going by the same method, you just create another value, this time from the measure ArrowUp, which checks if the variance to plan is positive and returns the triangle, pointing upwards.
The trick is to separate the two elements (triangles) and to only display the relevant one. You can do this when setting up the ArrowDown and ArrowUp measures, where they return blank if the variance to plan isn't negative or positive respectively. And if it returns blank, nothing is displayed within the smart narrative box.
Unfortunately, this now only works for the first comment. So you have to go through all this process again for the second and third comments, and beyond. Unfortunately simply copying won't work, as it will return only a static text.
Still, by going with this procedure, you can end up with pretty much the same final version as with the matrix.
Note: If you're interested in learning more about this method, you can read our tutorial here: How to Implement Writeback Comments in Power BI Using Power Apps.
Power Apps is certainly the most flexible option of everything at the moment. You can simply build a power app, where you have absolutely no limitation in terms of design. You can bring it into your Power BI report via this Power Apps visual for Power BI. The trouble is that someone had to develop this app, of course. So you need to have somebody who will create this app for you for commenting. Another drawback is that Power Apps may incur additional costs.
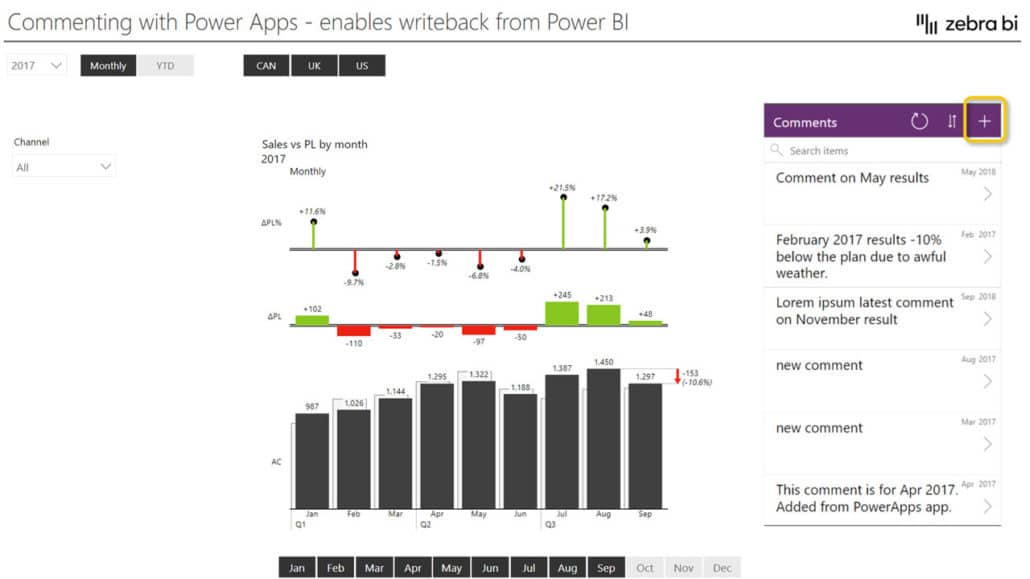
For example, the Power App can display all of your comments, which can be dynamic. But in addition to that, it has something that is not possible with all the other methods that we have mentioned today, and that is the ability to write back. Writing the comments back to a comment table, because now in the Power App, you can simply add a button to create a new comment. And now the end-user, or multiple end-users, can simply add the comments directly into the Power App and then just submit the item that will be dynamically linked back to your table.
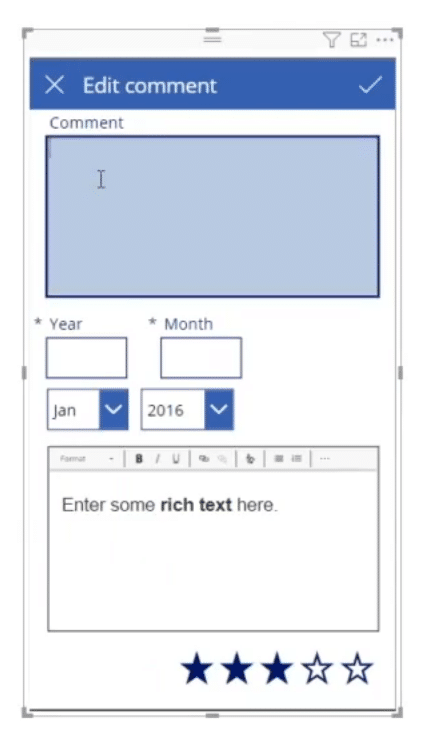
This table has to reside somewhere in SharePoint, OneDrive, Azure or a similar platform. And, of course, you can make it look however you want.
Another great ability of using comments in your Power BI reports is that you can put them into tooltips.
To learn more about smart tooltips and similar tips and tricks, watch this webinar: Top 10 Most Effective Power BI Dashboard Tips and Tricks in 2020.
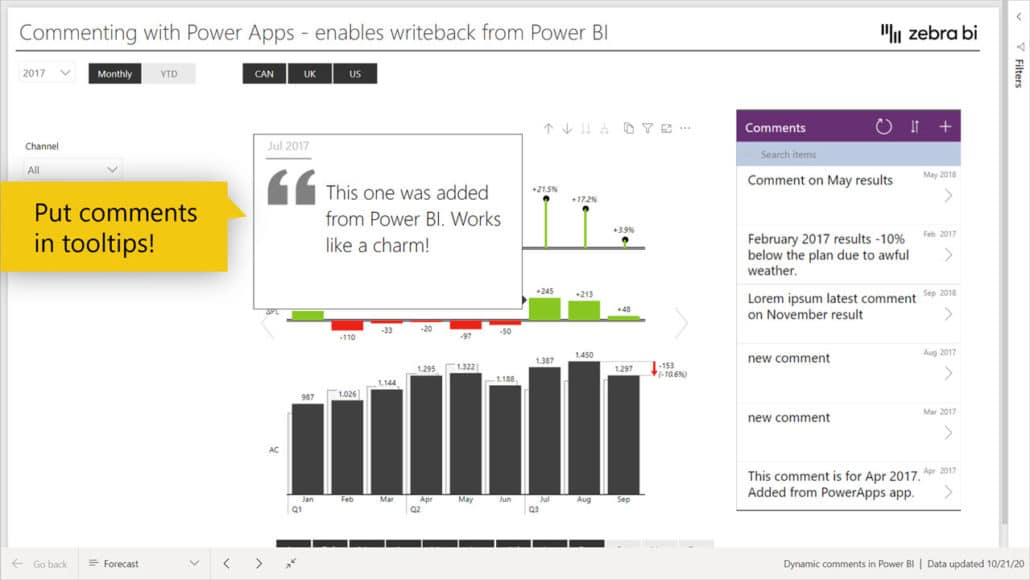
Linked comments are considered the holy grail of commenting. Unfortunately, there's simply no way to implement linked comments in Power BI. However, the Zebra BI team is developing this functionality so it's coming to the Zebra BI visuals (both the Zebra BI Charts and the Zebra BI Tables visual) soon. Here's a quick preview:
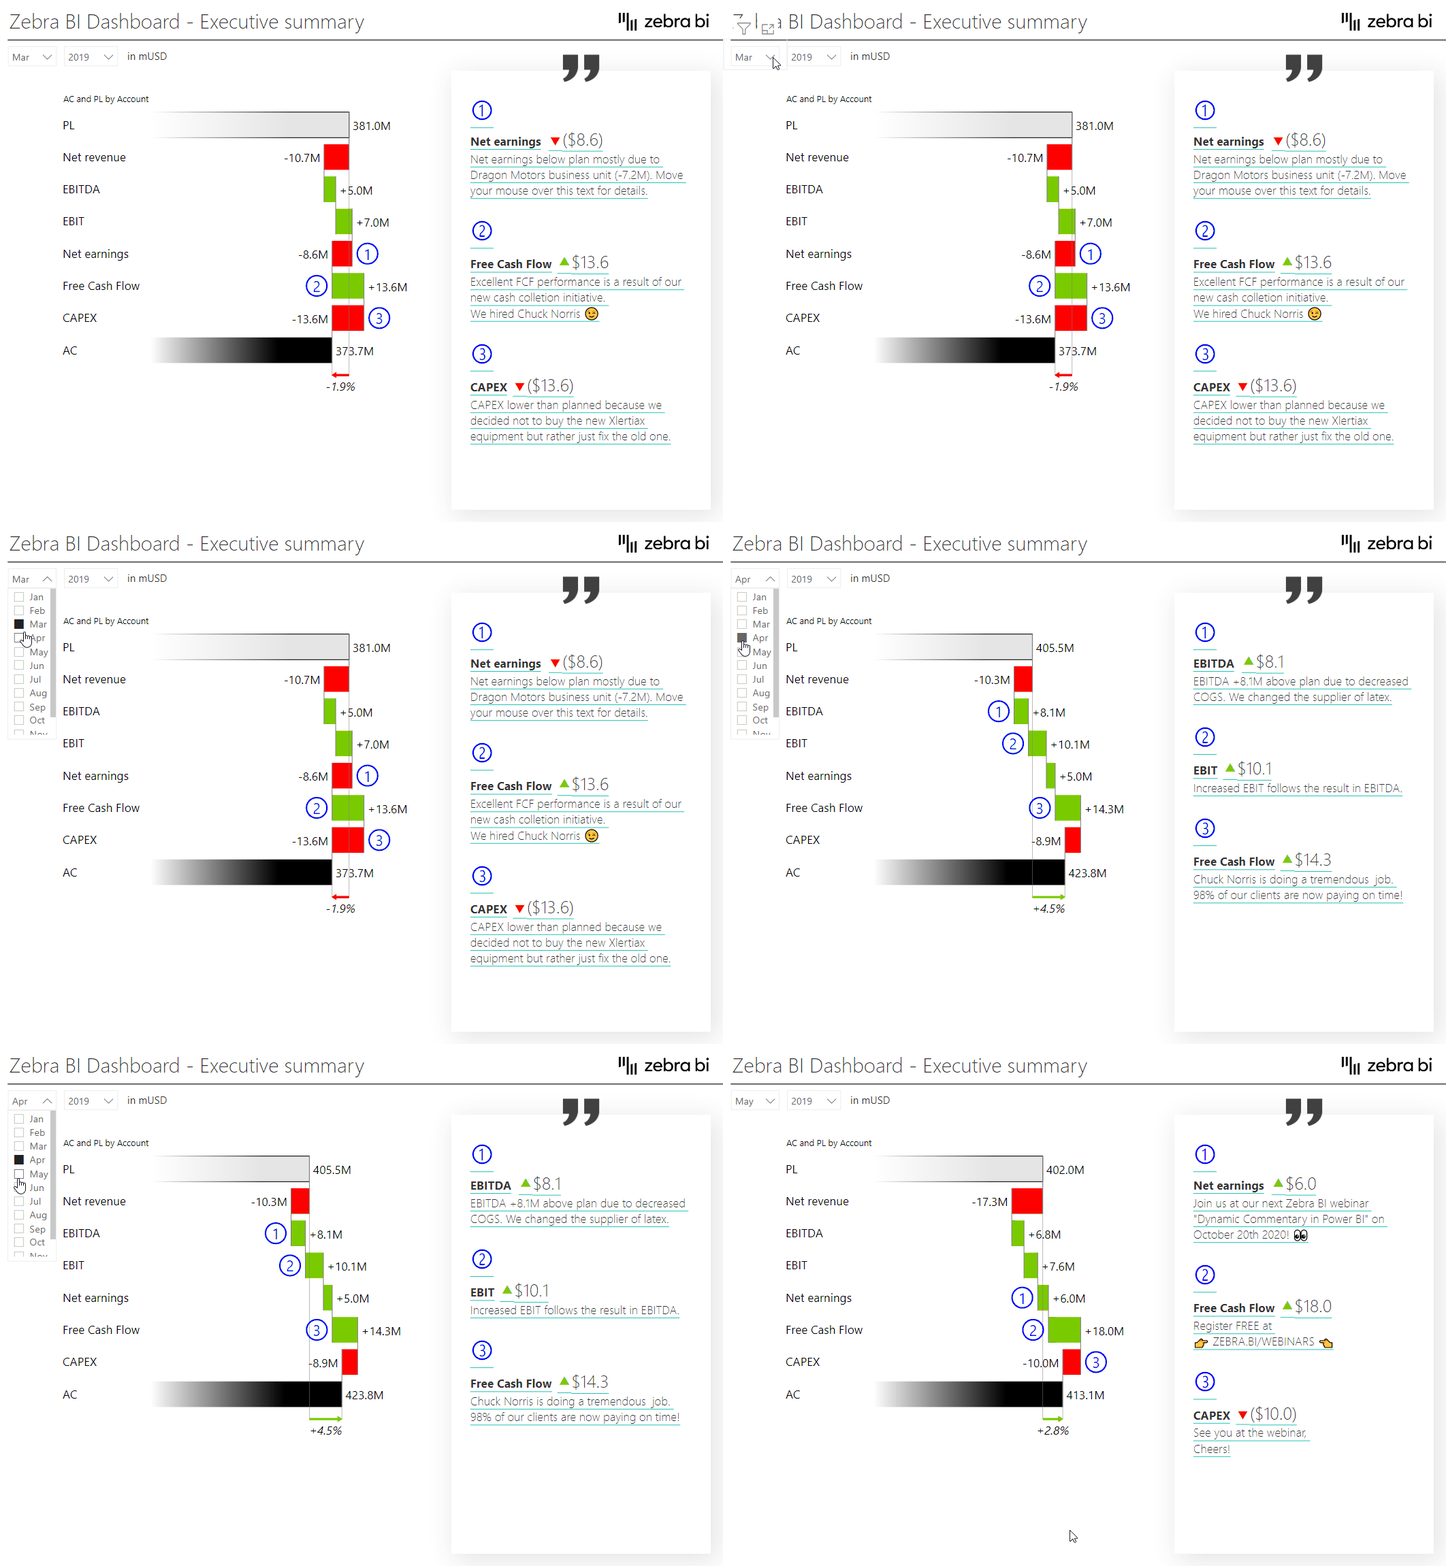
Like with most things, here too are pros and cons to all of them. At the moment, the most reliable one is the dynamic matrix. If you don't need dynamic comments, then you can simply use static text boxes and they'll do the work well enough. Then, the smart narrative is definitely something very, very interesting for the future, and we believe we will all use smart narratives for many different things, including dynamic commentary. So smart narrative will probably become the number one candidate for commenting in the future.
Matrix is a mature visual, as it just works and it works across several rows and much more. So at the moment, it's the safest method. And then in the future, you will perhaps be able to replace it with smart narrative or some other upcoming feature.
Hey,
Would you happen to have a guide detailing the method for the Power Apps option, or have a source you could recommend learning from? I haven't used Power Apps before.
Hi Clyde, unfortunately, we don't have instructions for it yet, but we might prepare something in the future. I'm inviting you to sign up for the newsletter so you'll get the invite by email in case we'll have a webinar related to Power Apps.
Great tutorial. Using it now.
However, What if I don't want my numbers formatted to Millions, and just want the default? Could you share what changes to the DAX would look like?
Hi Ron, thanks for your feedback. Glad to help. Just remove (or adjust) the FORMAT from the DAX. Cheers, Zebra BI Team
Hi,
You say you're actively working on linked comments at the moment, and this will be available soon.
How soon is 'soon'?
(I realise you can't commit to anything until it has passed testing and is ready, but some indication would be great. Are we talking 1 month, 6 months or 12 months+ for instance?)
Cheers,
Andy
Hi Andy, unfortunatelly this is not up to because Microsoft does not allow this feature for custom visuals. We recommend you use PowerApps for this. https://zebrabi.com/webinar/writeback-commentary-power-apps-webinar/