How to Remove Duplicates but Keep First Instance in Excel
If you work with Excel spreadsheets, you may have encountered the problem of having duplicate data. This can cause errors in your analysis and make it difficult to draw accurate conclusions from your data. Fortunately, Excel provides a built-in feature to help you remove duplicate data. In this article, we'll explore removing duplicates and keeping the first instance in Excel.
Why Removing Duplicates is Important in Excel
Before we dive into the nitty-gritty of how to remove duplicates, it's essential to understand why it's crucial. Having duplicate data can easily lead to errors in calculations and data analysis. For example, if you're calculating the average sales per region, duplicate data can result in an inflated number and an inaccurate picture of sales. By removing duplicates, you can ensure that your data is accurate, insightful, and actionable.
Moreover, having duplicate data can also take up unnecessary space in your Excel sheet, making it harder to navigate and work with. It can also confuse and make it challenging to identify the unique values in your data. By removing duplicates, you can streamline your data and make it easier to work with, saving you time and effort in the long run.
Understanding the Different Types of Duplicates in Excel
Before we jump into the steps for removing duplicates, it's crucial to understand the different types of duplicates in Excel. Excel recognizes two different types of duplicates: identical and unique. Identical duplicates are exact copies of each other, while unique duplicates are records that have different data but share a common identifier. For example, if you have two different customers with the same name but different addresses, they are considered unique duplicates. Understanding the different types of duplicates is essential because the method used to remove them varies slightly.
It's also important to note that Excel considers duplicates based on the entire row of data, not just a single cell. This means that if two rows have the same data in different cells, they will still be considered duplicates. Additionally, Excel allows you to choose which columns to consider when identifying duplicates, giving you more control over the process. By understanding the different types of duplicates and how Excel identifies them, you can effectively clean up your data and avoid any potential errors or inaccuracies.
Using the Built-In Remove Duplicates Feature in Excel
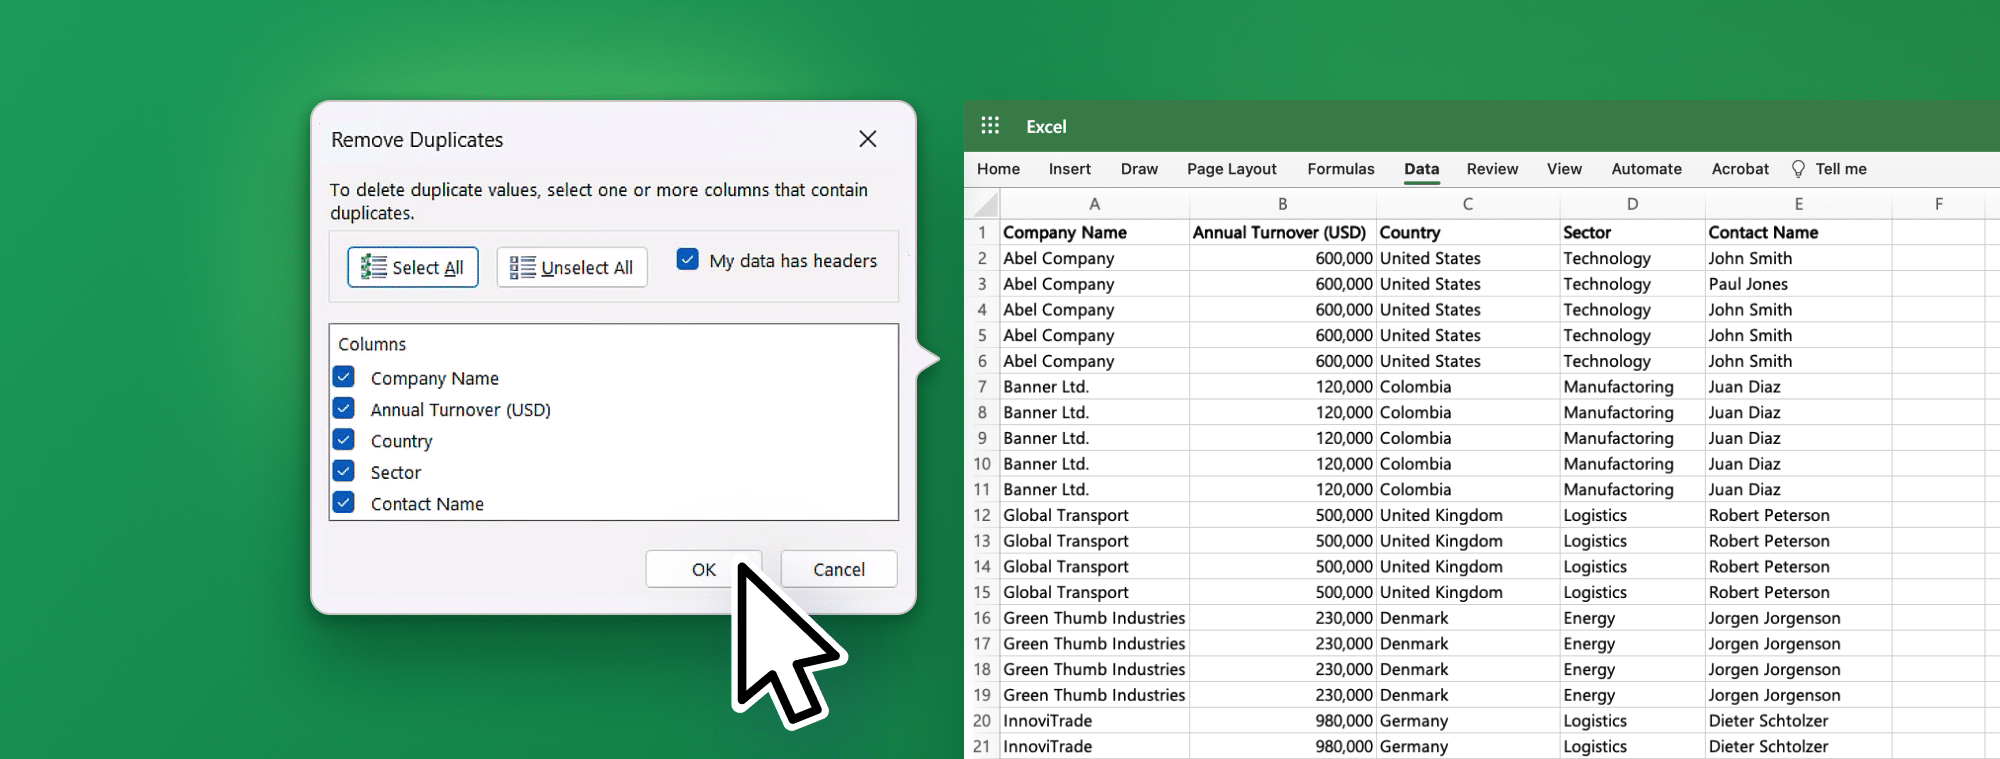
Excel provides a built-in feature to remove duplicates from a selected range of cells. To use this feature:
- Select the range of cells that you want to remove duplicates from
- Click on the 'Data' tab in the ribbon
- Click on the 'Remove Duplicates' button in the 'Data Tools' group
- Select the columns that you want to check for duplicate data
- Ensure that the 'My data has headers' option is selected if your data has headers
- Click on the 'OK' button
After performing these steps, Excel will remove duplicates and keep the first instance of the data.
It is important to note that the remove duplicates feature only removes exact duplicates. If there are slight variations in the data, such as extra spaces or different capitalization, the feature will not recognize them as duplicates. In this case, you may need to use other Excel functions, such as 'Trim' or 'Proper', to clean up the data before using the remove duplicates feature.
Additionally, the remove duplicates feature can be used in combination with other Excel functions, such as 'Filter' or 'Sort', to manipulate and analyze your data further. For example, you can use the remove duplicates feature to identify unique values in a column and then use the filter function to display only certain values based on specific criteria.
How to Keep the First Instance of a Duplicate in Excel
By default, Excel removes all duplicates in a selected range of cells. However, if you want to keep the first instance of a duplicate, follow these steps:
- Select the range of cells that you want to remove duplicates from
- Click on the 'Data' tab in the ribbon
- Click on the 'Remove Duplicates' button in the 'Data Tools' group
- Select the columns that you want to check for duplicate data
- Ensure that the 'My data has headers' option is selected if your data has headers
- Uncheck all the columns except for the column where you want to keep the first instance of duplicates
- Click on the 'OK' button
After performing these steps, Excel will remove duplicates and keep the first instance of the data based on the selected column.
It is important to note that this method only keeps the first instance of duplicates based on the selected column. If you have duplicates in other columns, they will still be removed. Additionally, if you have multiple instances of duplicates in the selected column, only the first instance will be kept.
Sorting Data Before Removing Duplicates in Excel
Sorting data before removing duplicates can help you identify duplicate data more quickly. To sort data:
- Select the range of cells that you want to sort
- Click on the 'Data' tab in the ribbon
- Click on the 'Sort' button in the 'Sort & Filter' group
- Select the columns that you want to sort by
- Choose the sort order for each column (ascending or descending)
- Click on the 'OK' button
After performing these steps, your data will be sorted, making it easier to identify duplicate data.
Additionally, sorting data can also help you analyze trends and patterns in your data. By sorting your data in a specific order, you can easily identify the highest or lowest values or group data by specific categories. This can be especially useful when working with large datasets or when trying to identify outliers in your data.
Using Conditional Formatting to Highlight Duplicates in Excel
If you want to highlight duplicates visually, you can use conditional formatting in Excel. To do this:
- Select the range of cells that you want to highlight duplicates in
- Click on the 'Home' tab in the ribbon
- Click on the 'Conditional Formatting' button in the 'Styles' group
- Select 'Highlight Cells Rules' and choose 'Duplicate Values'
- Choose the formatting style you want to use for duplicates (cell color, font color, etc.)
- Click on the 'OK' button
After performing these steps, Excel will highlight all duplicates in the selected range of cells based on the formatting style you chose.
It is important to note that conditional formatting can also be used to highlight other types of data in Excel, such as values above or below a certain threshold, cells that contain specific text, or cells that meet certain criteria. This feature can be very useful for quickly identifying important information in large data sets.
Removing Duplicates Across Multiple Columns in Excel
If you need to remove duplicates across multiple columns in Excel, you can use a combination of the 'Remove Duplicates' and 'Concatenate' functions. To do this:
- Select the range of cells that you want to remove duplicates from
- Insert a new column to concatenate the cells that you want to check for duplicates
- In the new column, use the 'Concatenate' function to combine the cells that you want to check for duplicates
- Use the 'Remove Duplicates' feature, selecting the concatenated column as the column to check for duplicate data
After performing these steps, Excel will remove duplicates based on the concatenated cells.
It is important to note that when using the 'Concatenate' function, you need to ensure that the cells are combined in the correct order. For example, if you are checking for duplicates in columns A and B, you need to make sure that the cells in column A are listed first in the 'Concatenate' function, followed by the cells in column B. This will ensure that the concatenated cells are unique and accurately reflect the data in the original columns.
Advanced Techniques for Removing Duplicates in Excel
Excel provides several advanced techniques for removing duplicates, including:
- Using formulas to identify and remove duplicates
- Using the 'Advanced Filter' feature to remove duplicates
- Writing VBA macros to automate the process of removing duplicates
These techniques may require more advanced knowledge of Excel, but they can be helpful for large datasets or complex analysis.
Another technique for removing Excel duplicates is using the 'Remove Duplicates' feature. This feature can be found under the 'Data' tab, allowing you to select the columns you want to check for duplicates. Excel will then remove any rows that have duplicate values in those columns. This technique is quick and easy to use but may not be as customizable as the other advanced techniques.
Tips and Tricks for Efficiently Managing Duplicate Data in Excel
In addition to the methods we've discussed for removing duplicates, there are several tips and tricks you can use to manage duplicate data in Excel, including:
- Regularly review and clean your data to keep it accurate and up-to-date.
- Using filters to sort and analyze data more efficiently
- Merging data from multiple sources into a single worksheet to reduce duplication
- Using pivot tables to summarize and analyze large datasets
Incorporating these tips and tricks into your workflow can save time, increase accuracy, and draw more insightful conclusions from your data.
Another helpful tip for managing duplicate Excel data is conditional formatting. This feature allows you to highlight cells that contain duplicate values, making it easier to identify and manage them. You can also use conditional formatting to highlight cells that contain unique values, which can be helpful when you're working with large datasets.
Additionally, you can use Excel's built-in data validation feature to prevent duplicate data from being entered in the first place. This feature allows you to set rules for data entry, such as requiring unique values or limiting the range of acceptable values. By using data validation, you can ensure that your data remains accurate and consistent over time.
Best Practices for Maintaining Clean Data in Your Excel Spreadsheets
To maintain clean data in your Excel spreadsheets, there are several best practices you should follow, including:
- Standardizing naming conventions for columns and fields
- Using data validation to ensure that data is entered in the correct format
- Regularly checking for and removing duplicates
- Using descriptive headers and comments to make your data more readable and understandable
By following these best practices, you can ensure that your Excel spreadsheets are accurate, manageable, and easy to use.
Common Mistakes to Avoid When Removing Duplicates in Excel
When removing duplicates in Excel, there are several common mistakes you should avoid, including:
- Not checking for unique duplicates
- Not correctly checking for duplicate data across multiple columns
- Not sorting data before removing duplicates
- Not selecting the correct range of cells when removing duplicates
By avoiding these common mistakes, you can ensure your data is accurate and reliable.
Removing duplicates in Excel can be a time-consuming process, but it is essential for ensuring the accuracy and reliability of your data. By following the steps outlined in this article, you can remove duplicates and keep the first instance of the data in a few simple steps. Incorporating best practices, tips, and tricks can help you maintain clean, usable data in your Excel spreadsheets.

 September 8th
 February 22nd


