How to Insert Checkbox in Excel Without Developer Tab
Discover how to insert checkbox in Excel and simplify data management. Excel is a powerful tool for managing data, but handling large data sets can be challenging. One way to simplify this task is by using checkboxes. Checkboxes offer an intuitive way to select or de-select options in a spreadsheet, thereby streamlining data manipulation and enhancing readability. If you're managing items, tasks, or a selection of data points, checkboxes eliminate the need for manual data entry and prevent human errors.
Adding checkboxes to your spreadsheet might seem like an advanced task, especially for those new to Excel or without access to the developer tab. This tab, generally used for Excel's more complex, application-building features, is not always readily available, depending on your version of Excel or administrator settings. However, do not worry; there is a straightforward way to insert checkboxes in Excel without using the developer tab.
Why You Might Want to Use Checkboxes in Excel
Understanding the benefits of checkboxes is crucial before adding them to your Excel sheet. Checkboxes are highly effective tools for organizing data, specifically when managing multiple items on a list.
- Streamlined Task Management: Checkboxes enable you to swiftly scan a list, immediately identifying completed tasks, those in progress, and outstanding ones. This visual representation of your data enhances efficiency and reduces time spent on task management.
- Reduced Errors and Improved Accuracy: Checkboxes significantly mitigate the risk of errors associated with manual data entry. By clicking on a checkbox to signify task completion, you ensure your data is always accurate and current, enhancing overall data integrity.
- Enhanced Collaboration: Checkboxes also play a crucial role in team projects. By denoting completed tasks, they offer team members a quick view of pending tasks and their responsibilities. This clarity improves communication and aligns everyone toward shared objectives.
Unlocking Efficiency with Checkboxes in Excel Spreadsheets
The use of checkboxes can significantly streamline your Excel spreadsheet experience. Beyond simplifying long lists, checkboxes facilitate easier data sorting and filtering.
- Simplified Project Tracking: Consider you're creating a spreadsheet to monitor the progress of a team project. Checkboxes, used to indicate completed tasks, provide a quick visual reference on what's been accomplished and yet to be completed.
- Data Protection and Standardization: Using checkboxes minimizes the risk of accidental deletions or modifications to crucial data. They act as a protective layer between the user and the raw data, ensuring data integrity. Additionally, checkboxes standardize data entry across various spreadsheets or data sets, simplifying comparative analysis and data interpretation.
- Time and Accuracy: Incorporating checkboxes saves time and improves data accuracy. The visually intuitive nature of checkboxes reduces errors caused by manual data entry or misinterpretation.
In summary, using checkboxes in your Excel spreadsheets enhances data management and analysis efficiency, saving time while improving accuracy.
Step-by-Step Guide to Adding Checkboxes to Your Excel Sheet
To add interactive checkboxes to your Excel sheet without using the developer tab, follow these steps:
- Accessing the Quick Access Toolbar: Click on the small down arrow on the top left corner of your Excel interface. In the drop-down menu, click 'More Commands.'
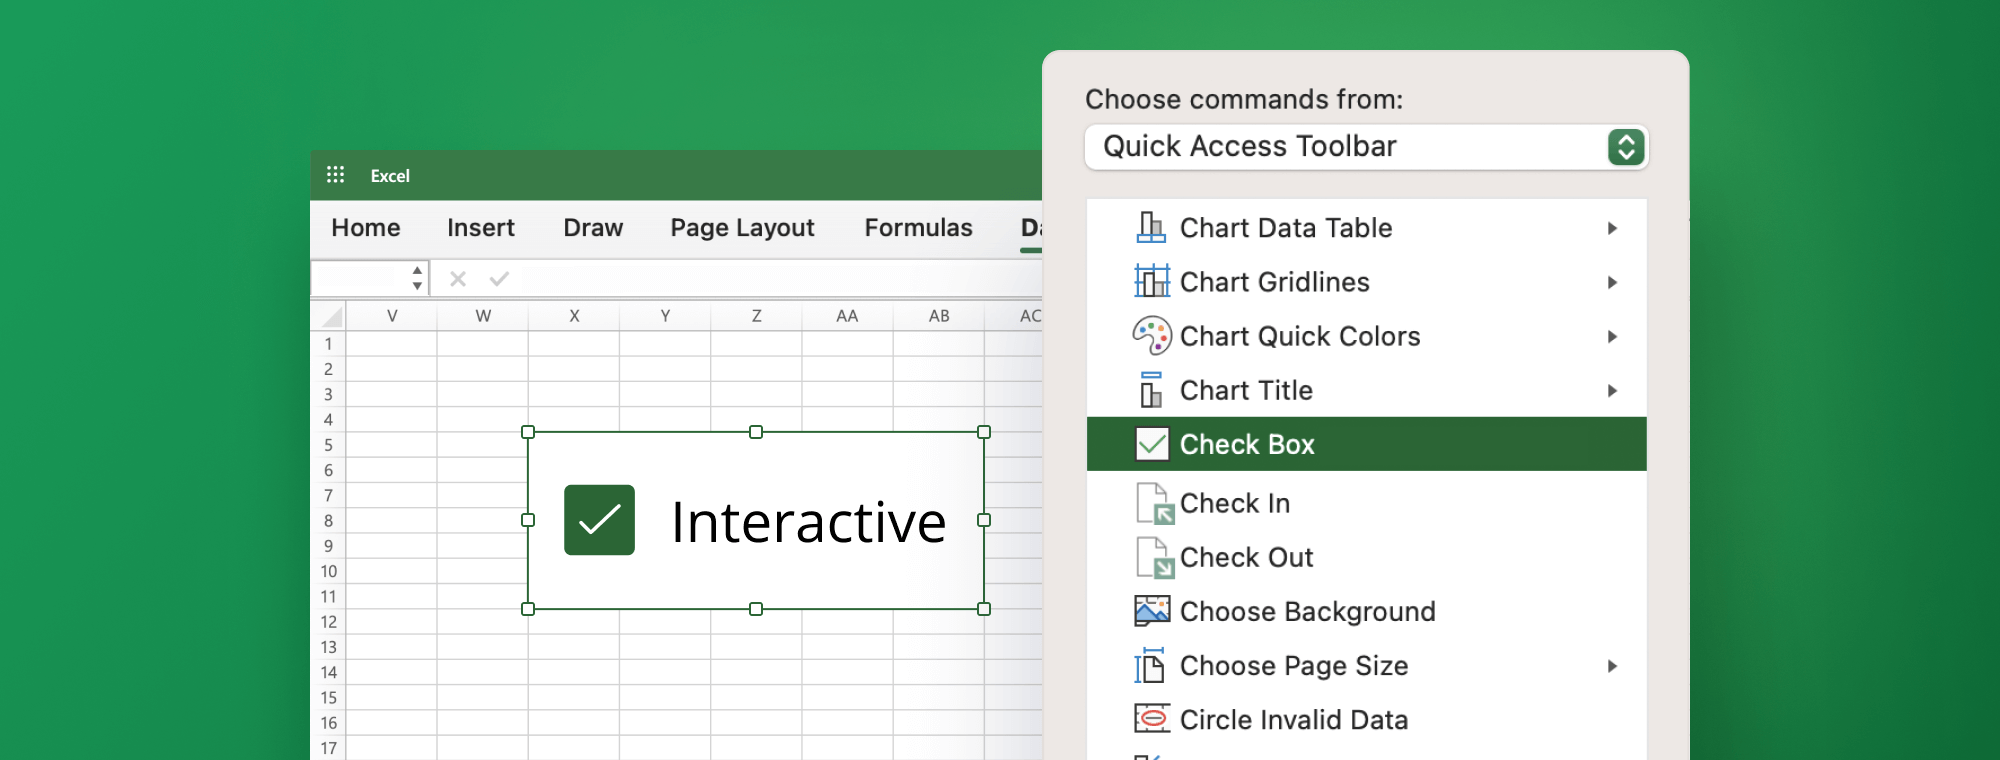
- Choosing Commands: In the 'Excel Options' dialog box, choose 'All Commands' from the 'Choose commands from' drop-down menu. Scroll down until you find the 'Check Box' and add it to the Quick Access Toolbar by clicking the 'Add' button. Then click 'OK'.
- Adding a Checkbox: Open your Excel sheet and select the 'Check Box' command from the Quick Access Toolbar. Your cursor will change into a cross. Draw a box in the cell where you want to insert the checkbox.
Your interactive checkbox is now inserted into the cell!
Using checkboxes in Excel can be a practical method to keep track of completed tasks or items. It allows for a quick visual confirmation of completed and pending tasks. Additionally, when combined with conditional formatting, checkboxes can help to highlight completed tasks or hide them from view automatically, enhancing your organizational efficiency and time management capabilities.
How to Use Checkboxes to Manage Data in Excel Easily
With checkboxes added to your Excel sheet, let's explore how to leverage them for efficient data management.
- Task Management: Insert checkboxes next to each item in a to-do list. As you complete each task, check the corresponding box. This visual representation allows a quick overview of completed and outstanding tasks.
- Surveys or Questionnaires: Checkboxes can be helpful in multi-choice questions, where more than one answer can be selected. For single-choice questions, radio buttons or drop-down lists are more appropriate. Regardless, visual data collection through checkboxes simplifies data analysis, allowing a quick overview of the most frequent responses.
- Data Filtering: Checkboxes can filter data based on specific criteria. In large data sets, selecting sure checkboxes helps quickly focus on the most relevant information, narrowing down results and saving valuable time.
The checkbox functionality is highly versatile and can be customized to suit various requirements across different Excel applications.
Tips and Tricks for Customizing Your Excel Checkboxes
Customizing Excel's checkboxes can further enhance their utility and aesthetic appeal. Here's how to do it:
- Resizing Checkboxes: After inserting a checkbox, adjust its size by clicking and dragging the edges. This can make checkboxes easier to interact with or fit better within your spreadsheet layout.
- Linking Checkboxes to Cells: Link a checkbox to a cell to display 'TRUE' when checked and 'FALSE' when unchecked. Right-click the checkbox, select 'Format Control,' go to the 'Control' tab, and enter the reference cell in the 'Cell link' box.
- Conditional Formatting with Checkboxes: Apply conditional formatting to cells linked to checkboxes based on the checkbox status. This way, you can change the cell color and add data bars or even icons, providing a richer visual representation of your data.
- Design Mode and Checkbox Interaction: When using Form Controls, you can interact with checkboxes (i.e., check and uncheck them) without being in Design Mode. Hold down CTRL + click on the checkbox if you want to adjust their properties. However, if you're using ActiveX Controls, you need to turn on Design Mode to make changes to the controls but turn it off to use the controls.
Remember, customization can significantly augment your Excel checkboxes' functionality and visual appeal, making them an even more powerful tool in your data management arsenal.
Common Errors When Adding Checkboxes in Excel and How to Fix Them
Occasionally, you may encounter issues when working with checkboxes in Excel, such as checkboxes that won't check or uncheck or that don't update the linked cells properly. These issues can usually be resolved with a few basic troubleshooting steps:
- Check the Worksheet Protection: If your worksheet or workbook is protected, it could prevent the checkboxes from being checked or unchecked. You can try unprotecting the worksheet by going to the 'Review' tab and then clicking 'Unprotect Sheet.' Please note that you may need a password if one was set when the worksheet was protected.
- Review Cell Link: If the linked cell isn't updating when you check or uncheck the box, the issue could be with the cell link. Double-check that the checkbox is correctly linked to the intended cell. To do this, right-click the checkbox, select 'Format Control,' and then verify the 'Cell Link' field under the 'Control' tab.
- Check for Macro Interference: In some cases, macros could interfere with the operation of checkboxes. If your worksheet has macros enabled, try disabling them temporarily to see if this fixes the problem.
Remember, a well-functioning checkbox can greatly enhance your efficiency in Excel, so understanding how to troubleshoot common issues is crucial for smooth data management.
Different Types of Checkboxes and When to Use Them in Excel
Excel offers two types of checkboxes: Form Controls checkboxes and ActiveX Controls checkboxes. Each has its unique features, and the type you choose will depend on the nature of your data and how you plan to use checkboxes in your spreadsheet.
- Form Controls Checkboxes: These are simpler to use and better suited for creating checklists or to-do lists in your spreadsheet. By linking the checkbox to a cell, you can easily track the completion status of each item on your list. This checkbox remains interactive in the worksheet view, allowing for straightforward and interactive data representation.
- ActiveX Controls Checkboxes: These are more versatile and allow customization, including font style changes and color modification. These checkboxes are used when creating forms or when you need a more user-friendly interface for data entry, especially when combined with other ActiveX Controls like text boxes or command buttons. ActiveX checkboxes become interactive when the worksheet is in the 'Design Mode.'
While both checkboxes can be linked to cells and allow interaction, they offer different levels of customization and usability depending on the specific needs of your spreadsheet tasks.
How to Link Checkboxes to Other Cells in Your Spreadsheet
Linking checkboxes to other cells in your spreadsheet is a powerful way to automate data entry and enhance your Excel data management. To link a checkbox to another cell, follow these steps:
- Right-click on the checkbox and select 'Format Control.'
- Under the 'Control' tab, in the 'Cell link' field, specify the cell to which you want the checkbox to be linked.
When a checkbox is ticked, the linked cell will display 'TRUE'. Conversely, when the checkbox is unticked, the linked cell will show 'FALSE'.
The benefits of linking checkboxes to other cells include:
- Easy Data Tracking and Analysis: Linking checkboxes to cells is especially beneficial in project management. If you have a checkbox for each task in a project, linking each checkbox to a cell can visually indicate the task status. This clear representation enables quick identification of completed and outstanding tasks.
- Reduced Data Entry Errors: Automating data updates based on checkbox selections minimizes the risk of human error in data entry. The checkbox is an intuitive, binary data input method that keeps your data accurate and up-to-date.
By understanding and leveraging the ability to link checkboxes to cells, you can greatly enhance the accuracy and efficiency of your data management tasks in Excel.
Using Formulas with Checkboxes for Automatic Data Entry in Excel
To truly harness the power of checkboxes in Excel, you can couple them with formulas to automate data entry in your spreadsheet. One common way to do this is by using an IF function, which can automatically input a value in a cell based on the status of a checkbox.
For instance, if a checkbox is linked to cell A1, you could use the following formula in cell B1:
=IF(A1, "Completed", "Pending")
With this formula, cell B1 will display 'Completed' when the checkbox is ticked (cell A1 reads TRUE) and 'Pending' when the checkbox is unticked (cell A1 reads FALSE).
Such a technique is incredibly beneficial when dealing with large amounts of data. Using formulas with checkboxes can minimize manual data entry, reducing the risk of errors. Furthermore, this method can be employed to create dynamic spreadsheets that update automatically based on the status of your checkboxes, making your data management tasks efficient and effective.
Advanced Checkbox Techniques for Streamlining Your Workflow
Once you've got the hang of using checkboxes in Excel, you can start employing advanced techniques to streamline your workflow further.
- Macro Buttons: You can create macro buttons that automatically check or uncheck a series of checkboxes based on your criteria. This is particularly useful when dealing with large checkboxes and can dramatically speed up your workflow.
- Conditional Formatting: Another advanced technique is to use conditional formatting to highlight cells based on the status of their corresponding checkboxes. For instance, if you link a checkbox to a cell, you can set conditional formatting for that cell to change its color whenever the checkbox is ticked or unticked. This visualization can help you quickly identify which tasks have been completed and which still need attention.
- VBA Code: Finally, if you are comfortable with VBA (Visual Basic for Applications), you can create custom functions that allow you to manipulate checkbox values more sophisticatedly, such as automatically updating other cells based on a checkbox's status. This can be a powerful tool for creating highly interactive and dynamic spreadsheets.
By mastering these advanced techniques, you can significantly enhance your productivity and efficiency when working with checkboxes in Excel, taking your data management skills to the next level.
Troubleshooting Tips for When Your Checkbox Isn't Working Properly
Occasionally, you may encounter issues when working with checkboxes in Excel, such as checkboxes that won't check or uncheck or that don't update the linked cells properly. These issues can usually be resolved with a few basic troubleshooting steps:
- Check Formatting: It might be a formatting issue if your checkbox isn't responding to clicks. Ensure that the checkbox isn't locked. To check this, right-click the checkbox, click 'Format Control,' and ensure the 'Locked' box is unchecked under the 'Properties' tab.
- Review Cell Link: If the linked cell isn't updating when you check or uncheck the box, the issue could be with the cell link. Double-check that the checkbox is correctly linked to the intended cell. To do this, right-click the checkbox, select 'Format Control,' and verify the 'Cell Link' field under the 'Control' tab.
- Protecting the Worksheet: If the worksheet is protected, you may be prevented from interacting with the checkbox. Unprotect the worksheet to see if this solves the problem. Click on the 'Review' tab, then 'Unprotect Sheet.' Note: This step may require a password if one was set when the worksheet was protected.
- Check for Macro Interference: In some cases, macros could interfere with the operation of checkboxes. If your worksheet has macros enabled, disable them temporarily to see if this fixes the problem.
Remember, a well-functioning checkbox can greatly enhance your efficiency in Excel, so understanding how to troubleshoot common issues is crucial for smooth data management.
Examples of Real-World Uses for Checkboxes in Excel Sheets
To put all of this information into context, let's consider a few real-world examples of how checkboxes can be used in Excel sheets:
- To-Do Lists: In a to-do list, you can add a checkbox next to each task. As you complete each task, you check off the corresponding box. This helps you visualize progress and quickly see what's still outstanding.
- Project Management Spreadsheets: In a project management context, checkboxes can be used to track task completion. Adding a checkbox next to each task and linking it to another cell allows you to create a dynamic overview that reflects project progress in real time.
- Audit or Compliance Checklists: For compliance or auditing purposes, checkboxes can help track which items meet certain criteria. For instance, you could create a checklist of standards or regulations and use checkboxes to indicate whether each has been met.
- Surveys or Feedback Forms: If you're creating a survey or feedback form, checkboxes can make it easier for respondents to select multiple options from a list of choices. Once responses are collected, you can then analyze the data more efficiently.
Now that you know how to add checkboxes to your Excel sheet without using the developer tab and how to customize, troubleshoot, and integrate them with other Excel features, you can harness this powerful tool to streamline your data management and improve your workflow. Happy spreadsheeting!