How to Add Checkboxes in PowerPoint: A Comprehensive 5-Step Guide for Engaging Presentations
PowerPoint is an incredibly versatile software that you can use to create visually appealing and interactive presentations. One way to make your presentations more engaging is through checkboxes. These little boxes can prompt your audience to take specific actions, provide feedback, or mark progress as you move through different points in your presentation.
In this article, we'll look at how you can add checkboxes to your PowerPoint presentations, customize them, add animations and transitions, troubleshoot common issues, and use them creatively to enhance your presentations.
Understanding the Purpose of Checkboxes in PowerPoint
Before getting into the nitty-gritty of adding and customizing checkboxes in PowerPoint, you need to understand their purpose. Checkboxes serve as a visual aid that helps enhance your presentation's overall appearance and functionality. You can use them to create interactive elements that engage your audience and encourage participation. You can add checkboxes to text boxes, shapes, and even images.
One of the main benefits of using checkboxes in PowerPoint is that they allow you to simplify complex information. By breaking down information into smaller, more manageable chunks, you can make it easier for your audience to understand and retain. Checkboxes can also highlight key points or emphasize important information, making it more memorable for your audience.
Another advantage of using checkboxes in PowerPoint is that they can help you to save time and increase efficiency. By using checkboxes to gather feedback or collect information from your audience, you can quickly and easily compile data without recording responses manually. This can be especially useful when gathering information from a large group of people, such as during a survey or poll.
Moreover, checkboxes in PowerPoint serve as an effective tool for engaging your audience and promoting interaction. Their use extends beyond mere aesthetics - they can stimulate audience participation, a crucial factor for successful presentations, especially in collaborative environments like departmental reviews. Understanding this can help avoid common pitfalls in FP&A analysis, as detailed in our article "9 Common Mistakes of an FP&A Analyst – And How to Avoid Them".

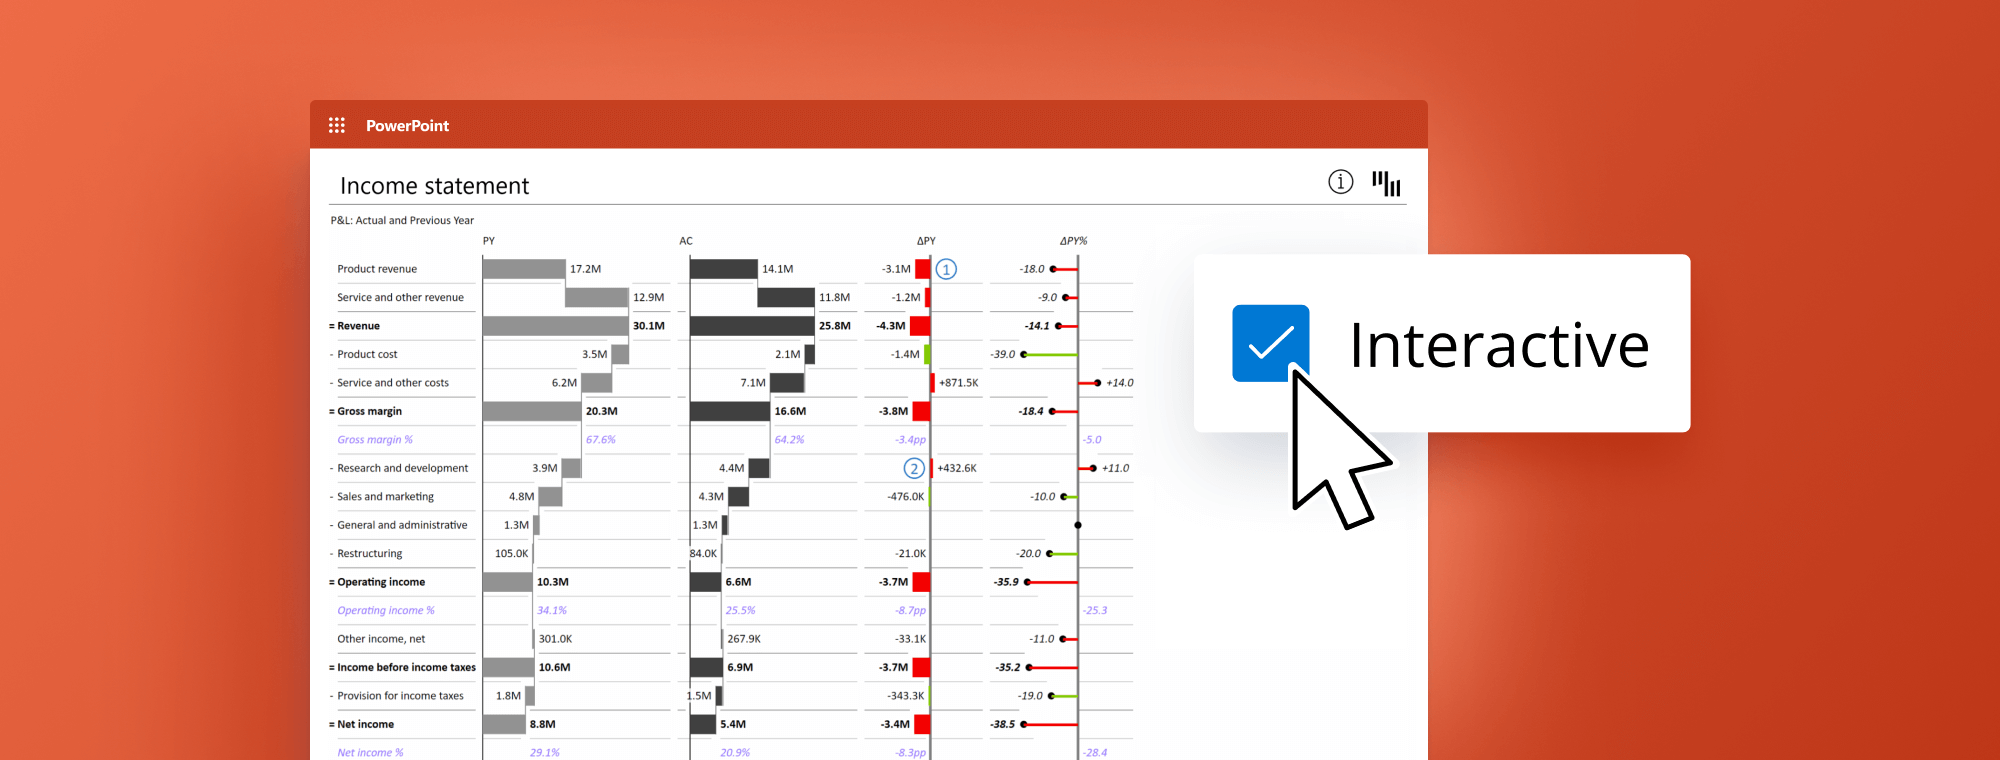
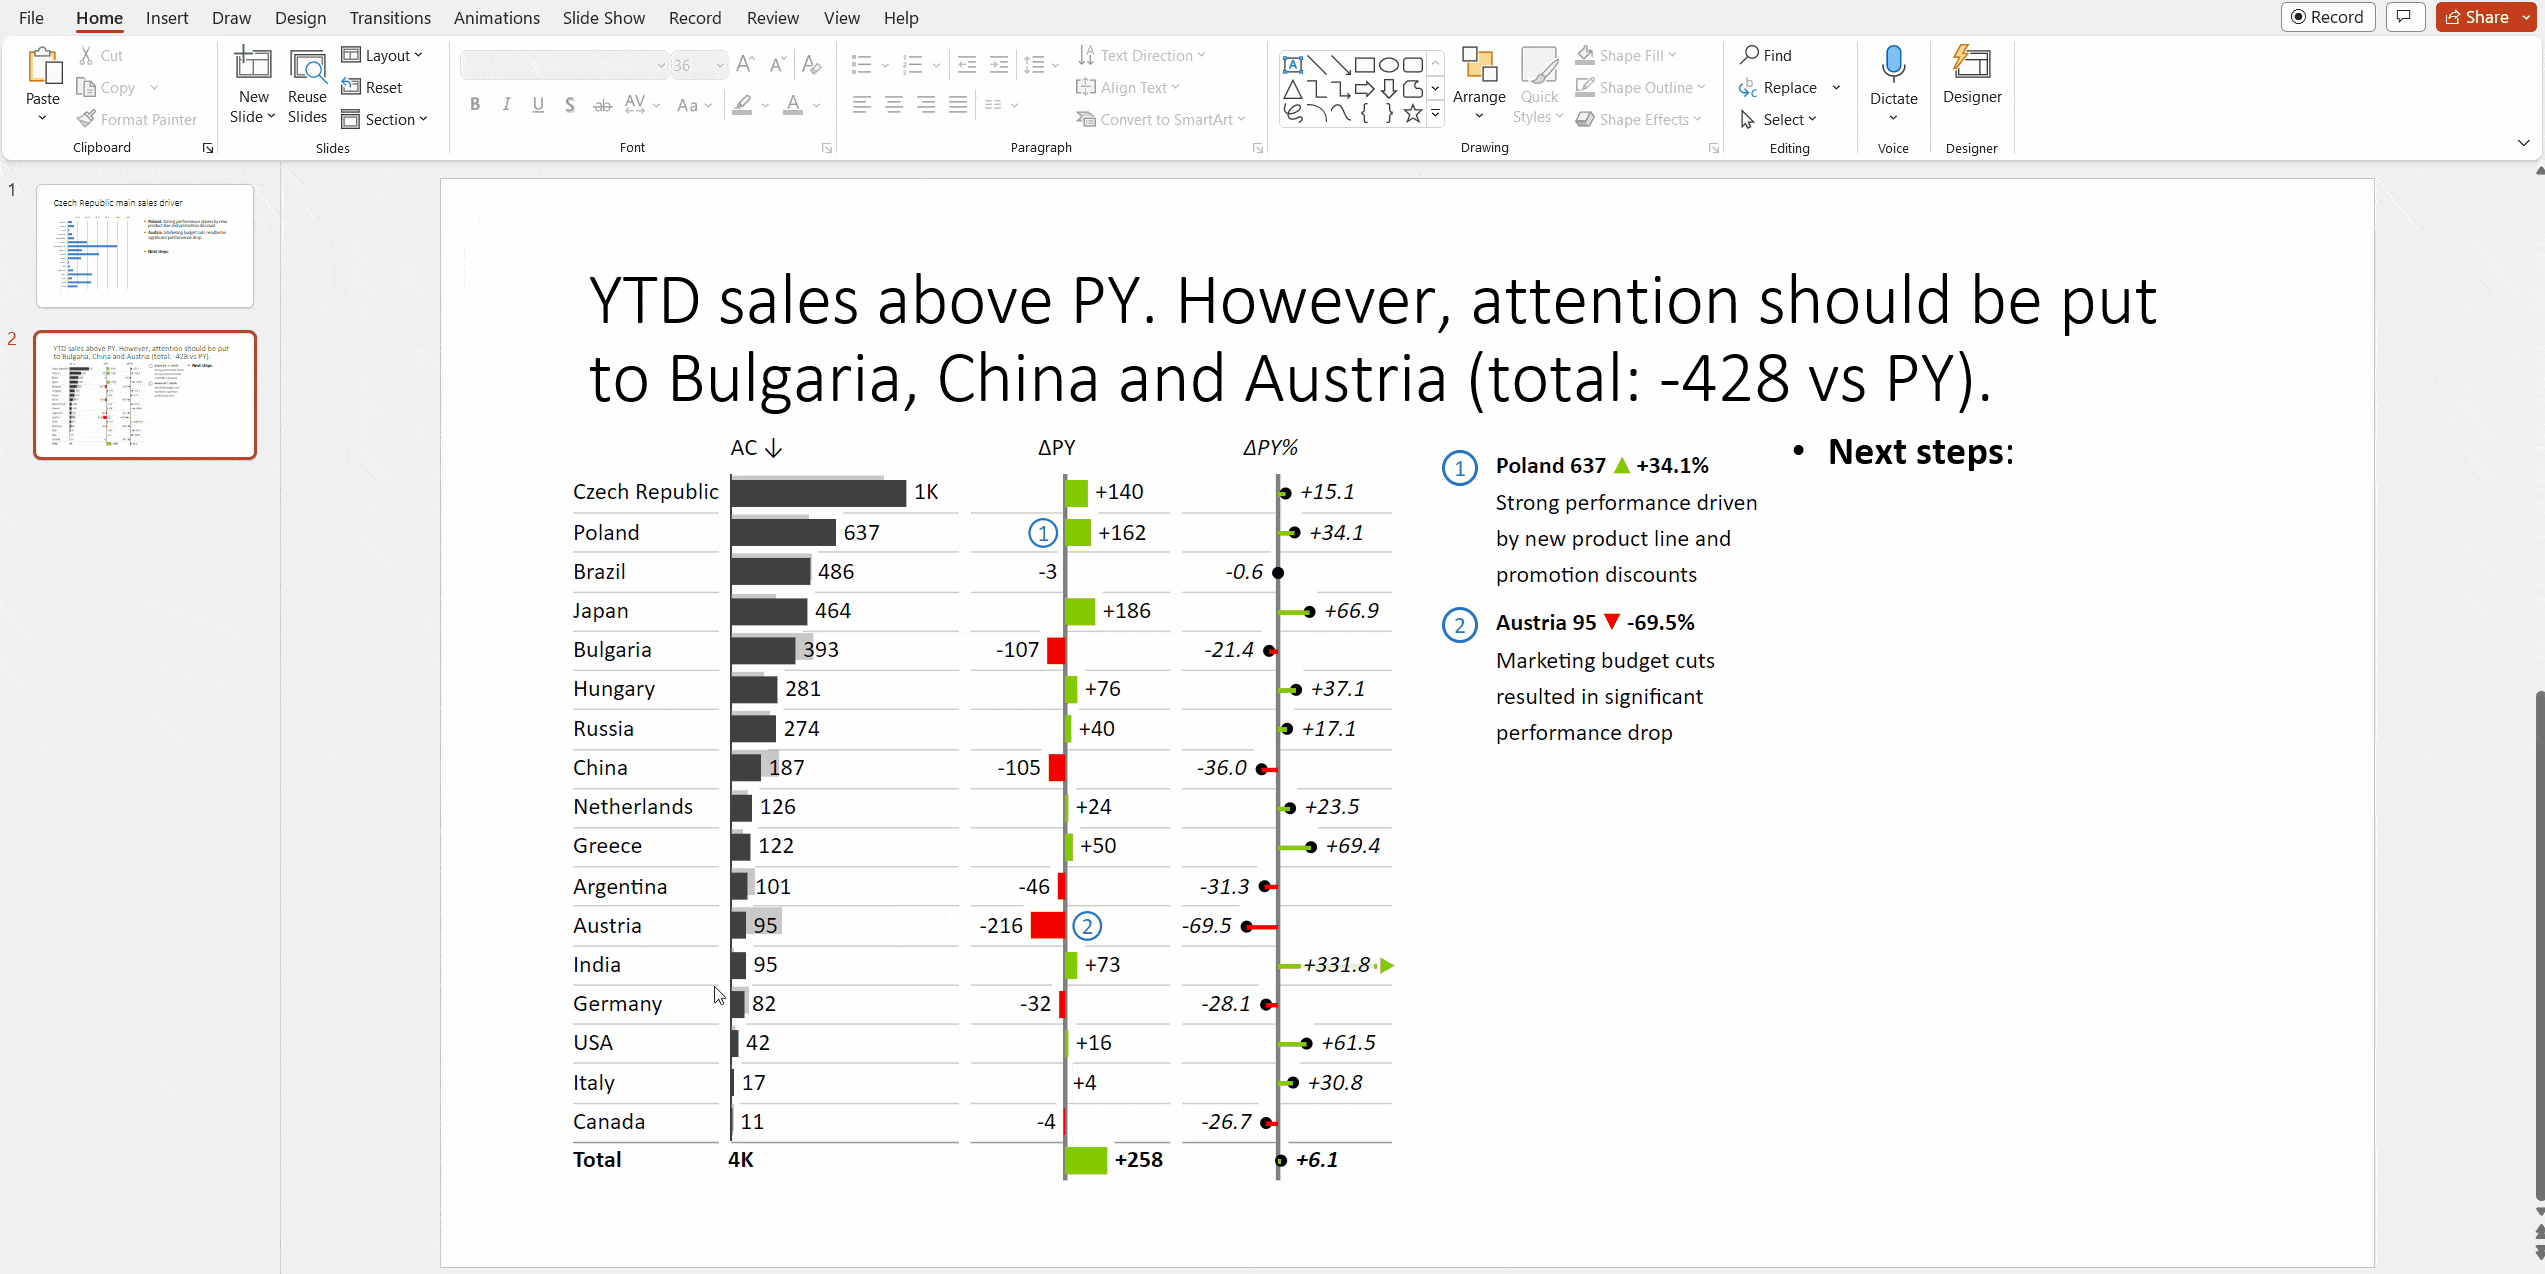
Create interactive charts & tables in PowerPoint with a simple click
Discover how Zebra BI for PowerPoint can elevate your data storytelling to a new level. Transform your presentations into compelling, interactive experiences.
Step-by-Step Guide to Adding Check Boxes in PowerPoint
Adding checkboxes in PowerPoint is a relatively simple process. Follow these steps to get started:
1. Enable the Developer Tab: Go to File > Options > Customize Ribbon. Check the box next to Developer under the Main Tabs section.
2. Insert Checkbox from the Developer Tab (add GIF: Check Boxes Edit)
3. Click and drag it to place it where you want it to be
4. Change text: Right-click the Checkbox, Go to Checkbox Object, then choose Edit. Change text and Click outside the checkbox to apply the changes.
5. Customize it: Go to the Developer tab, select the Checkbox, and choose Properties in the Controls Section. In the properties pop-up window, you can change fonts, colors, backgrounds, etc.

However, a few things to remember when using checkboxes in your presentation. Firstly, ensure the check box is aligned properly with the text or associated image. This will make it easier for your audience to understand the purpose of the check box.
Secondly, if you are using checkboxes for a survey or feedback form, make sure to include clear instructions on how to use them. This will help your audience to provide accurate and relevant responses.
How to Customize Checkboxes in PowerPoint
One of the most significant advantages of using checkboxes in PowerPoint is their flexibility and customizability. You can change their size, color, shape, and even the text associated with them. With a few simple tweaks, you can seamlessly make them fit your brand or presentation style.
You can customize checkboxes in PowerPoint in the following ways:
- Change the size of the checkbox using corner handles.
- To change the color of the checkbox, select it and choose a new fill color.
- Edit the text inside the adjacent textbox. Change its font, color, size, and alignment, or remove it altogether.
Adding Checkboxes to Multiple Slides in PowerPoint
If you want to use checkboxes across your entire presentation, there's no need to add them slide by slide manually. Instead, you can add them to just one slide, copy them, and then paste them onto all the other slides where you want them.
Troubleshooting Common Issues with Adding Checkboxes in PowerPoint
Although a relatively simple process, adding checkboxes to PowerPoint presentations can sometimes be tricky, here are some common issues users face and how to fix them:
- If the checkbox won't move, ensure it isn't grouped with other objects on the slide.
- If you want to change the checkbox size, you can edit its size in the Shape Format by selecting it and applying the size in the ‘Size' section.
Using Checkboxes for Interactive Presentations in PowerPoint
Presentations don't have to be static and one-sided. You can use checkboxes in PowerPoint to create interactive presentations that engage your audience and require their participation. For instance, you can use checkbox questions and surveys in your presentation, where the attendees mark off their responses instead of the traditional closed-ended questions. You can also use checkboxes as virtual progress bars to indicate how far along you are in a process or activity.
In addition to their use in questions and surveys, checkboxes are effective tools for outlining and tracking the next steps, milestones, or instructional guides. Visualizing progress or tasks enhance the clarity and comprehension of your presentations, making them more engaging and productive.
Best Practices for Using Checkboxes in PowerPoint Presentations
Like any other PowerPoint element, checkboxes work best when used judiciously. Here are some tips on how to use checkboxes effectively:
- Use fewer check boxes than you think you need. Including too many checkboxes can make your presentation cluttered and unappealing.
- Ensure the text associated with each check box is concise and easy to read.
- Customize them to align them with your corporate theme (color pallet)
- Copy-paste them instead of inserting them one by one
- Align the checkboxes and associated text boxes to create a professional look.
For further reading:
- Best practices for creating PowerPoint templates for business presentations
- How to use PowerPoint to create compelling sales presentations
- 7 Tips for Creating Effective Financial PowerPoint Presentation: Best Practices and Techniques
Examples of Creative Ways to Use Checkboxes in PowerPoint
You can use checkboxes in PowerPoint in several creative ways to enhance your presentations' visual appeal and interactivity. Some examples include:
- Using checkboxes to indicate progress or milestones during a presentation or project
- Creating interactive quizzes and polls that your audience can take during the presentation
- Using a series of checkboxes to show a step-by-step process, such as a recipe or instructional guide.
Adding Animations and Transitions to Checkboxes in PowerPoint
Add animations and transitions to your checkboxes to create a more visually engaging presentation. In PowerPoint, you can use different animation effects such as 'Appear' or 'Fly In' to make your checkboxes more dynamic and engaging. You can also use transitions such as 'Fade' or 'Push' when moving from one slide to another.
How to Remove or Edit Checkboxes in PowerPoint
If you want to remove a check box from your PowerPoint presentation, click on the checkbox and press the Delete key or right-click and select 'Delete.' If you want to edit a checkbox, select it and use any customization options discussed above.
Tips for Designing Effective Checkbox Layouts in PowerPoint
When it comes to creating effective and visually appealing check box layouts in PowerPoint, here are a few tips:
- Use visual hierarchy to make sure that the most important checkboxes stand out.
- Align the checkboxes and associated textboxes neatly to create a cohesive look.
- Avoid crowding the checkboxes too close together, making the presentation look cluttered.
- Use contrasting colors for the checkboxes and the background to make them stand out.
Incorporating Other Interactive Elements with Checkboxes in PowerPoint
The possibilities of what you can do with checkboxes in PowerPoint are endless. You can use them in combination with other interactive elements, such as buttons, forms, or videos, to create presentations that are not only visually stunning but also engaging and interactive. Experiment with different combinations to see what works best for your purposes.
Using checkboxes in PowerPoint opens up a whole new world of interactivity and audience engagement. Following the steps and tips outlined in this article, you can easily add checkboxes to your presentation and create visually appealing and interactive experiences that keep your audience engaged and attentive. With a little creativity and imagination, the possibilities of what you can achieve with checkboxes in PowerPoint are endless.
Enhance Interactivity with Zebra BI for PowerPoint
For professionals who strive for an even higher level of engagement and dynamic data presentation, consider Zebra BI for PowerPoint. Zebra BI for PowerPoint offers you an array of advanced features to elevate your interactive presentations:
- Interactive Charts and Tables: Zebra BI enables you to create interactive charts and tables that allow your audience to interact with the data more effectively.
- Sorting: Sorting features let you order your data in a way that highlights key points, simplifying data comprehension and comparison for your audience.
- Top N Feature: The 'Top N' feature offers a way to display the top performers in your dataset, making it easy to focus on the most crucial elements.
- Automatically Calculated Variances: With Zebra BI, you don’t need to calculate variances manually. The tool does it automatically, saving you time and ensuring accuracy.
- IBCS Compliant: Zebra BI visuals adhere to International Business Communication Standards (IBCS), making your data presentations consistent, clear, and comprehensible across all business areas.
By integrating Zebra BI into your PowerPoint toolkit, you can leverage these features to enhance the interactivity of your presentations and effectively communicate complex data. Its user-friendly interface and advanced capabilities make it an invaluable tool for any data-driven presentation.
Create advanced charts and tables in PowerPoint with ease!
Step up your game and join the professionals enhancing their PowerPoint presentations with Zebra BI. Become a master of data communication.